
This two part post covers foot care tips for both on and off the trail. Topics covered: selecting footwear, prepping your feet, checking your gear and my favorite foot gear. Our feet can take us wonderful places, here are a few ways I keep mine happy! Happy hiking!
Before You Hit the Trail
Before we dig in, let me say that I am not a doctor, or any type of authority in foot care – everyone’s feet are beautifully unique and in some instances, you may need to consult with a medical professional. That being said, I have fussy feet, have learned from some mistakes and injuries…and have found things that work for me though these experiences. So let’s get started!

Get the Right Footwear!
If you are just starting out, a pair of sneakers and a school backpack should work just fine for day hiking. Once you get a few miles under your belt and decide to get hiking specific footwear, I recommend talking to an experienced footwear sales person to get fitted. Your favorite outdoor store should have specialized staff, but don’t forget about running and stand alone shoe stores, they can be helpful in spotting biomechanics and recommending shoes based on how you move. Sizing and getting a shoe that fits your foot shape is very important, so don’t be afraid to ask for help. I ‘did my own research’ and made the mistake of buying shoes that were too big and too loose because I was told that my feet would swell on the trail. My feet didn’t swell, and I was left with a poorly fitting shoe and a nasty set of blisters.

Don’t be afraid to try different footwear (ie: trail runners vs boots) and just see which feels better for your feet. Don’t let anyone, including me, convince you to use one particular brand or style. I went through 3 pair of heavy, waterproof hiking boots and about a dozen black toenails before switching to trail runners. I bought waterproof boots because people warned and strongly advised me to get them, when I was just starting out. I’d previously had injuries to both ankles, a broken a foot, plantar fasciitis…and those heavy ‘supportive’ boots weren’t doing me any favors. I kept my Keen Targhees as workboots because they are so durable, but no longer use them for distance hiking. Lightening my backpack to 25-30 lbs and switching to a lightweight supportive, high cushion shoe ended up preventing the kinds of blisters and other injuries that I had been suffering with, so that’s what works for me.

Fix Your Feet!
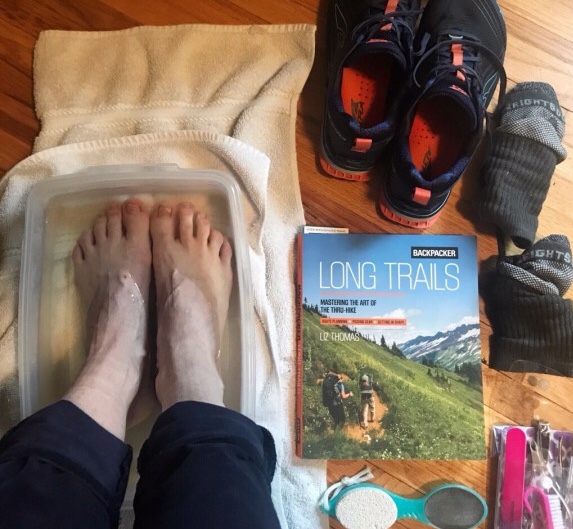
I read the book “Fixing Your Feet” after ending my Superior Hiking Trail thru hike early. (Links below in my gear list) Coming off trail after 100 miles and feeling pretty unprepared and beat up left me searching this 392 page book for answers. Despite creating what I thought was a thoughtful foot care routine, I ended up with painful blisters on the balls of my feet, scrambling to patch them with duct tape and blisters under my big toenails that resulted in permanent damage.
John Vonhof, the author of “Fixing Your Feet” brings 30+ years of experience as an ultra marathoner, hiker and medical professional. “This comprehensive resource covers the full gamut of footwear basics, prevention and treatments. If it can happen to a foot, it’s covered in this book.”

This book taught me about the concept of shear, which was the biggest culprit contributing to my toenail issues, and various blisters. It taught me how to pre-treat/condition my feet and repair them on the trail. I made several changes after reading this book including the socks and shoes that I wore, how I file my toenails, and which spots to pre-treat before every hike. After Fixing Your Feet, I was able to complete the Superior Hiking Trail injury free and haven’t had any significant blisters or foot injuries since 2018. Hundreds of muddy, rocky, rooty miles later, my feet are very happy and I wish I’d read this book sooner. If you are a team or group leader, I also recommend adding this to your reading list, so you can help others in your group if they end up with foot issues on the trail.
Treat Your Feet!
Treat yourself to a Hiker’s Pedicure! One of the key takeaways I learned in the book Fixing Your Feet, was the importance of removing calluses. Some people love their calluses and believe they make their feet tougher and more blister resistant. But, in my case, they were causing shear, resulting in deep, painful blisters. I did a little googling and found a DIY home foot soak that I use a few times a year to keep my feet in smooth shape. Smells a little funny, but I think the results are worth it.

Recipe for foot soak:
1 cup Epsom salts (lavender scented)
½ cup Vinegar
½ cup Listerine
4-5 cups hot water
Soak feet for 15 minutes.
Remove calluses and cracked heel skin with a heel file, alternating soaking feet
Trim nails and any other hard dead skin
Give a final scrub and polish, feeling your feet for any sharp edges or rough spots and then moisturize.
The whole process takes me a little less than an hour. Many of the injuries I had encountered were a result of hard calluses, sharp skin and toenails snagging on my socks and bottom surface of my shoe. Carefully smoothing these spots out and adding a lightweight, smooth sock and Engo patch, keep my feet happy and injury free. If you don’t want to do a DIY pedicure, you can always treat your feet at your local nail salon! If you are new to removing your calluses, its a good idea to do this a week or so BEFORE a big hike or trip, just in case your feet are still sensitive and need to adjust.

Check Your Gear!
If you have a favorite old pair of boots or shoes, it’s a good idea to check them periodically for worn fabric, holes, and uneven heel/tread wear. Pull out the insoles and inspect them and feel around inside the shoe for any rough spots. I like to get as much use as I can out of my hiking shoes, but if I find any of the above, I try to repair or move them into lighter use instead of using them for distance hiking. If you find a seam or slightly worn spot that is causing irritation, sometimes this can be fixed with an Engo Patch or moleskin and you can get more life out of your shoes.
I learned about checking my foot gear out the hard way on our thru hike when I realized (on day two) that the friction and shear that had been happening had worn out the foam cushioning in the bottom of my standard insoles, causing wear and injury to the ball my foot.
Socks should also be checked periodically for wear and replaced. Common wear spots are heels, toes, balls of the feet and pilling in high friction areas. When I come home from a hike, I shake out my socks right side out, shake them again inside out, wash them inside out (if they are fluffy), and hang them to air dry. I DO NOT run them through the dryer and think this helps them last longer and keep their shape.

Foot Gear Faves:
Here’s a list of my favorite foot gear for hiking and backpacking longer distances in varying conditions. Let me know if you have any questions and be sure to sure to share your faves too!
Shoe System:
- Altra Timps –wide toe box fits without being too tight or too loose
- Altra Gaiters – minimizes sand and debris-hook and velcro attachment
- Super Feet Trailblazer Insoles – fits the shape of Altras and has good metatarsal cushion
- Engo Blister Prevention Patches- allows smooth movement in high friction areas
Socks:
- Wrightsocks- Tab socks: synthetic, quick-drying, double layer
- Zensah Compression Sleeves – This combo allows easy access to my feet if they need attention and I think it helps prevent my ‘Hikers Rash’ or exercise induced vasculitis. Compression socks or sleeves can also help provide support for leg fatigue
- Darn Tough short or long socks- I prefer these for dry or shorter distances
- Sealskinz waterproof socks: used on consecutively wet or cold days with a Wrightsock
- Fleece or chenille sleeping socks: loose, soft, fuzzy, foot recovery overnight- “sacred socks” that are ONLY worn in my shelter
Treatments:
- Fixing Your Feet -Book: John Vonhof
- Hiker Pedicure- focusing on removing calluses and meticulous toenail filing
- KT Tape- this stretches and adheres the best on my feet in wet/damp conditions
- Gel Toe sleeves- for my fussy ring toe, also helpful f you are recovering from damaged toenails.
- Hike Goo- good overall foot salve for anti-friction, moisture resistance and healing. I have also used Trail Toes
Part two covers my journey to find the right hiking shoe, how I care for my feet day to day on the trail, what’s in my handy foot care First Aid Kit and a few items that did NOT work for me.

Do you have any favorite ways to keep your hiking feet happy? Stuff you’ve learned the hard way or things you wish someone had told you before you hit the trail? Feel free to share them here or continue the conversation on the Wandering Pine Facebook page. Its always good to hear from you and inspires me to keep writing.
Happy Feet & Happy Trails!
~WP
Wandering Pine is reader-supported and some of our blog posts may contain affiliate links. Learn more here.
Thank you for your support!