
It’s Art!
It’s a Backpack!
It’s ARTPACK!
As an artist, gear hacker and adventurer, I have really enjoyed the process customizing and creating a one-of-a-kind functional work of art in my new Crown3 60 undyed backpack . Embellishing my own ARTPACK creates an opportunity to combine two things I love and is such a fun challenge! I have been sharing the progression of this work on the Wandering Pine FB & IG and the top two questions I get are:
- What materials do you use?
- Are they waterproof/what happens if it rains?
I’ll cover both of those questions in this post, a few impressions of the pack itself and why you might want to create your own one of a kind piece of gear!
Note: This pack was provided to me by Granite Gear, to design and decorate however I wish, without obligation, as part of a larger art project they are sponsoring. You can learn more about this project and see the other cool art packs as they roll in on their Instagram page.
LETS GO!
Materials
The short answer on art supplies is to use anything labeled waterproof and permanent. I use a combination of things I have on hand and bought some paint and fabric markers to experiment with. You may have some of these things in your art supply box already, but if you need a few links to get you started, check out this list. And any time you purchase through Wandering Pine links, it helps me know that you find value in the work I do here and is so appreciated!
- Waterproof ink – dries to a water-resistant film (don’t add too much water)
- Acrylic Paint (use acrylic medium or minimal water to thin)
- Paint Pens (great for detail on top of paint layer)
- Fabric Markers (great for color fill and blending)
- Sharpie (colors may change or react to light over time-inexpensive)


Tips + Tricks
I have a BFA, with an emphasis in painting and mixed media, and I use all sorts of mediums and processes in my creative practice. That being said, watercolor techniques were difficult for me to achieve on a water resistant fabric surface and it was important to me to keep this piece of gear water resistant and durable since I’ll be using it on the trail. Below are some of the tips and tricks I used in painting and drawing on my pack.
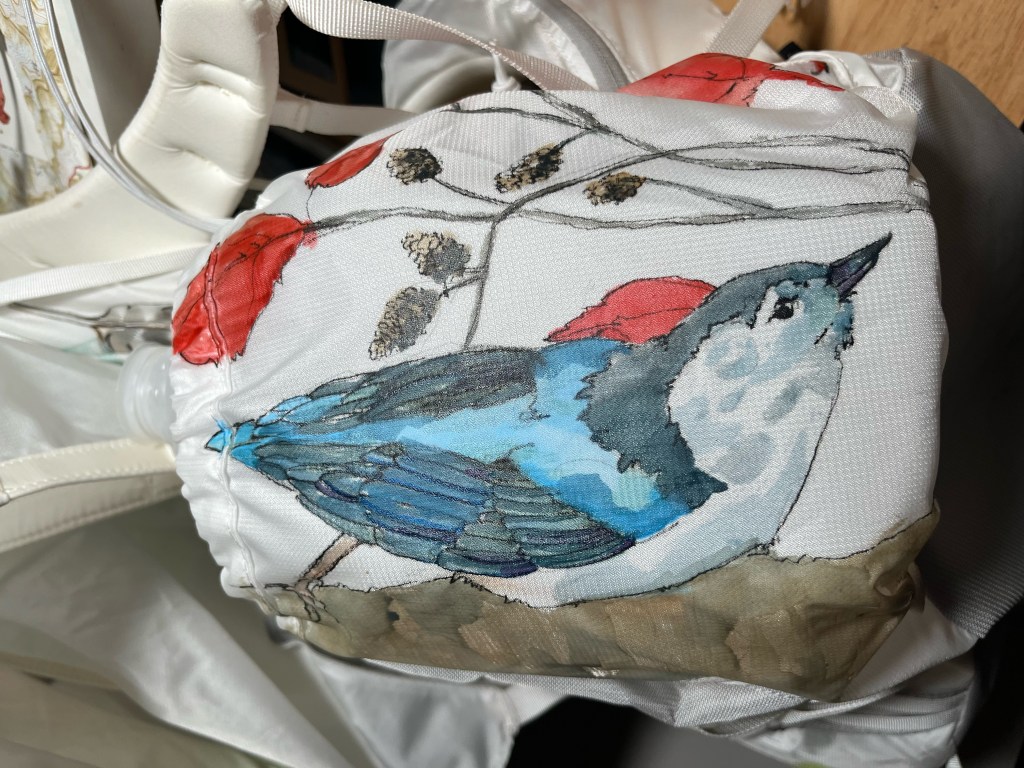
- Line your pack with stiff material and stuff it to make it easier to draw on. I used cardboard and pillows for the main compartment and discovered that a gallon jug fit perfectly in the side pockets to create a harder surface to work on.
- Use permanent waterproof ink pens, and art inks that come in a bottle with dropper
- When thinning paint, add acrylic medium or very little water to the consistency of whole milk or cream.
- Markers, Sharpies and Paint Pens are great for large areas and color filling and detail of over the top of paint layers – use a very light touch for line work as they will bleed and feather as a first layer on fabric. Start with light strokes and build up.
- The mesh front pocket took pigment better than I expected it to, and responded like a toothy canvas. I wish I had painted this part last, instead of first- I may have taken a different approach had I known the texture would respond so well.
- For depth and detail, I layered ink and thinned acrylic paint down first and then added paint pen and markers over the top for definition.

Testing + Water Resistance
Painting on a brand new white backpack felt pretty daunting before I started. I really didn’t want to mess it up or haul around a pack, with art on it that I didn’t enjoy looking at. One thing that helped me was having a good set of references from my adventure sketchbook and then testing out materials on a spot that was hidden. The underside of the pack “brain”/top compartment was a great spot to test out techniques, materials and is small enough that you can hold it under the sink and scrub it to make sure your artwork is going to stick.


Gear Notes
This is my second Granite Gear Crown 60 backpack and I’ve been using this one for training hikes and weekend trips since the Fall of 2022. My first one, lovingly named “Darth Vader”, is still in great shape and now gets loaned out to friends and family that need a pack. I used it on my Isle Royale Trip, and a few other adventures that needed a higher volume pack.
My preference would still be a 38L pack, just because I have a tendency to overpack in a 60L. But the Crown 60 has been a great pack, and the updated 3 60 builds on the thoughtful design features that gives it great reviews:
- Undyed- saves water in the manufacturing process
- Ultralight frame- weighs 2.48 lbs with lid and hauls up to 35 lbs
- Double chest strap like runners vests (both adjustable and removable)
- Strap bungees-water bottle, umbrella, etc holder
- REALLY roomy side pockets that can be full expanded or compressed
- Roomy front mesh pocket
- Brain/top compartment with small inner pockets that can be integrated with the hip belt as a fanny pack or clipped onto top straps for a chest pocket
- “Re-Fit” fully adjustable waist belt
- Roll top closure that can be expanded or reduced based on your pack capacity

Final Thoughts
I spent a lot of time overthinking the design of this pack before starting. It was really hard to decide what to paint, and I was stuck for a while. Eventually let go of all of that pressure to paint the perfect pack and decided to approach it like my ever evolving adventure journal, sketchbooks and patch collections…and just went for it. I hope this post encourages you to bring your creativity and love for the outdoors together and not get too hung up on doing it perfectly. Enjoy it!
I left plenty of spots on this pack to add new adventures and look forward to adding a spot for the Grand Canyon when I get back! Maybe adding a happy little tent or Lupine in the Spring, and just appreciating the evolving (and functional) art piece that this backpack is to me. ❤️
Have you customized, designed or decorated your own adventure gear? I’d love to hear about it! It’s such a fun creative expression and a way to make your gear one of a kind. Drop me a note in the comments or say a little hello on the Wandering Pine FB & IG.
Happy Trails!
~WP

Image credit: Cover photo taken at the Art Shanty Project Pollinator Stage
This blog is supported by amazing readers, like you. Thank you!
Wait, how does that work?
When you buy the gear you need through our custom links, the companies listed here provide a small commission back to Wandering Pine at no additional cost to you. It’s an easy way to show your thanks for this free content, keep this site running and lets us know that you find value in the work we do and that is SO APPRECIATED! Thank you!
Wandering Pine is reader-supported and some of our blog posts may contain affiliate links. Learn more here.
Thank you for your support!
I’m about to do this! And I’m so nervous! Do I have to scrub everything before I paint?
Hello! I started with a clean pack and did not scrub first. Mine is still holding up well – good luck!