Lately I have been doing less writing about the trail and more about skills I’ve learned as we prepare for our first thru hike. We are counting down the days until we hit the Superior Hiking Trail, so gear and food have been top of mind. Still staying as active as possible but MYOG (making your own gear) is way more interesting to talk about!
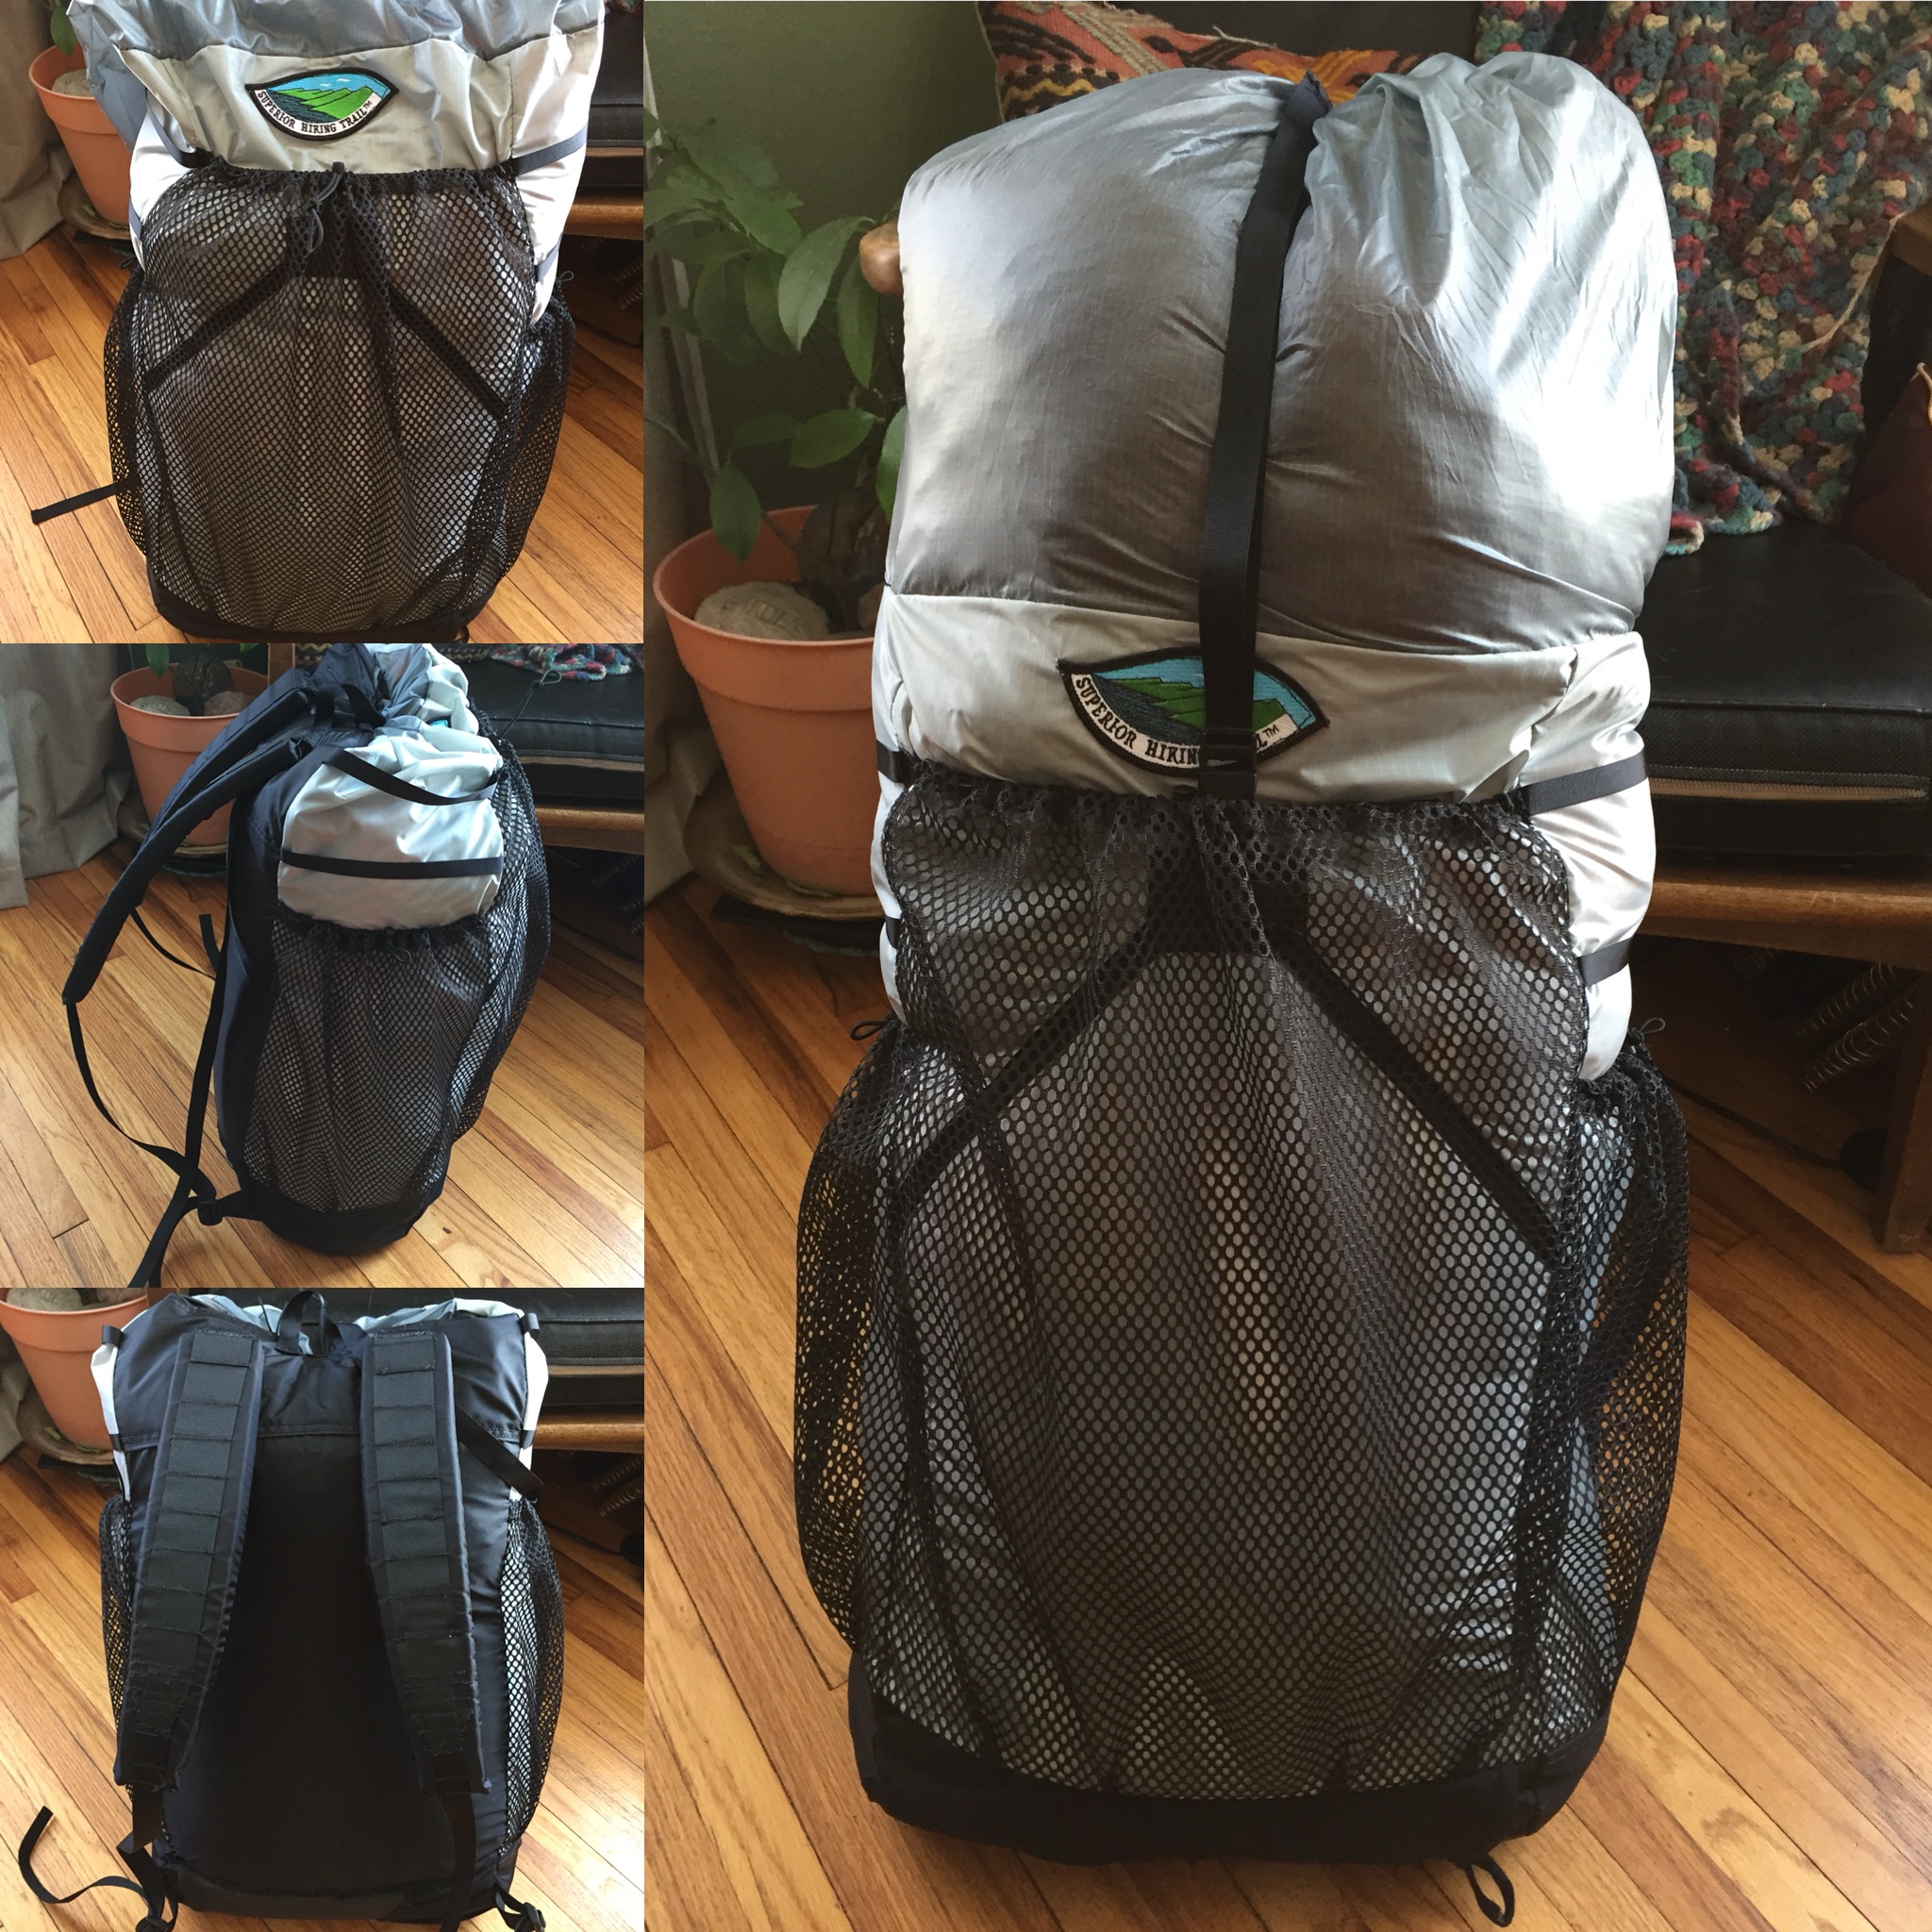
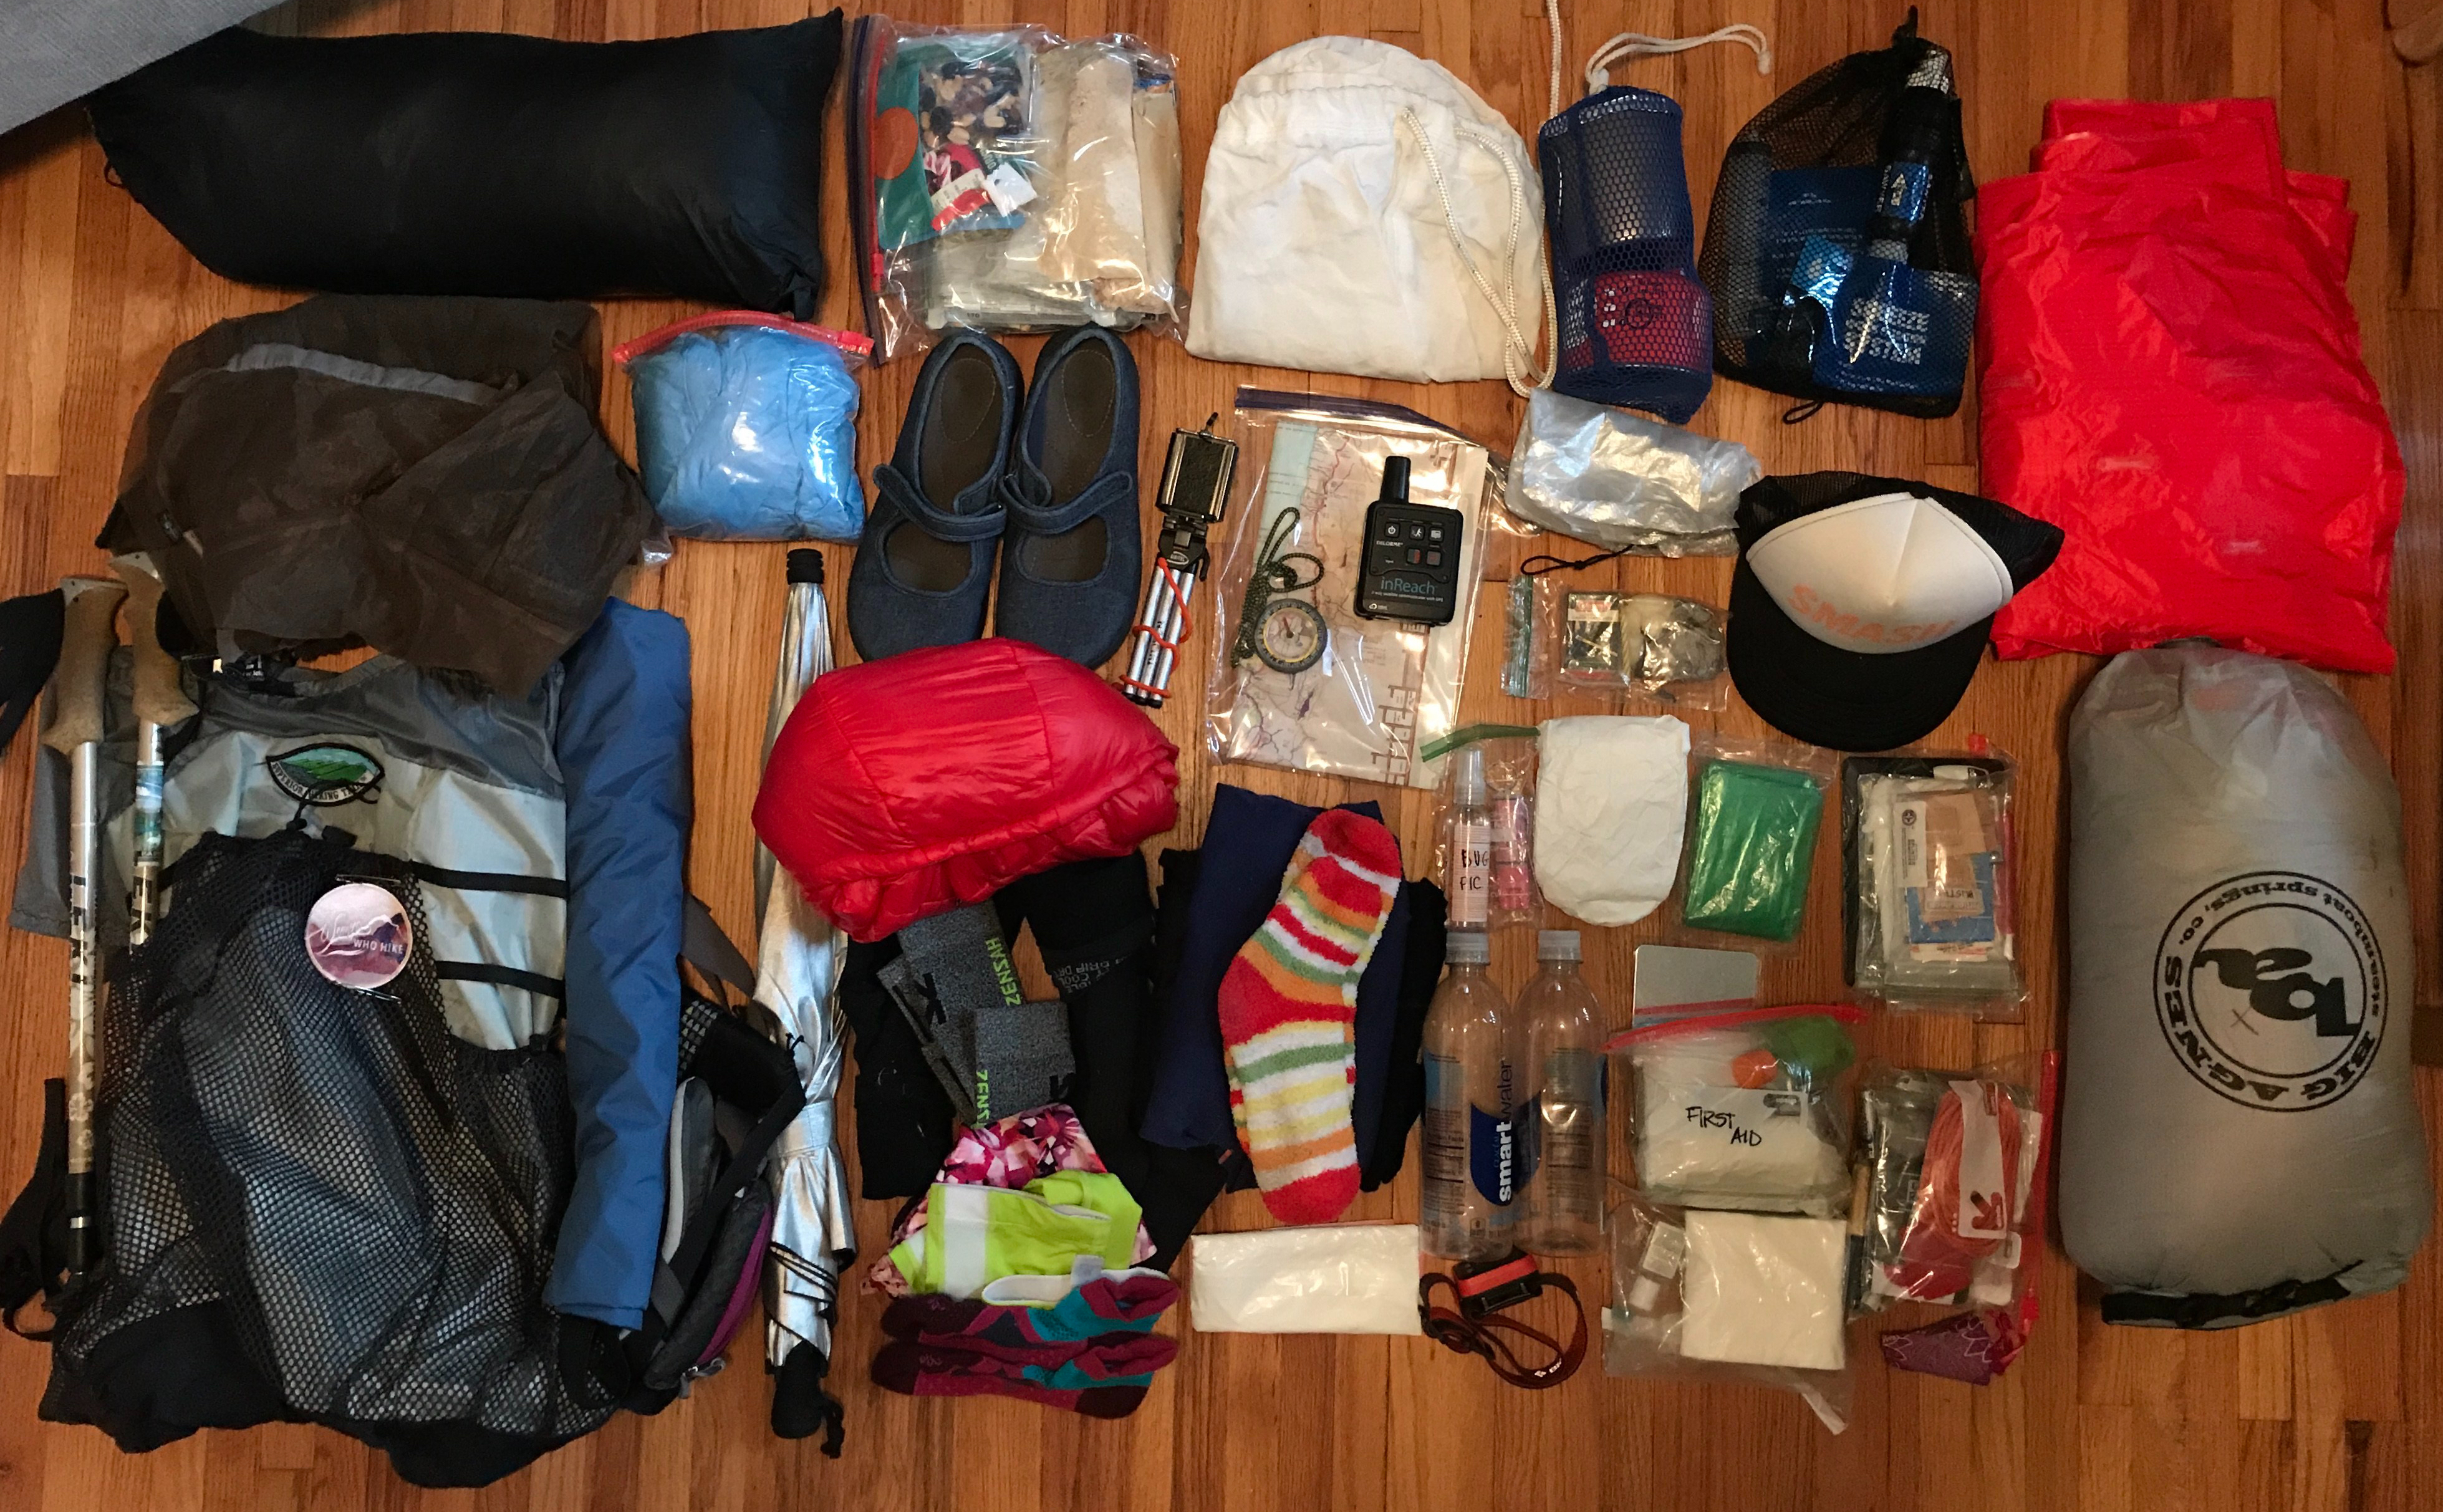
If you have been reading, you know that I made my own backpack a few months ago that eliminated about 3.5 lbs off my base weight and have been playing around with various hacks to continue to lighten the load. As of today, my total pack weight is 22 lbs with food and water. That’s less than half from where I started 5 years ago! The physical and mental benefits of carrying less has been a great discovery, so I am enthusiastically sharing that with you!
Here are 5 things I have made from scratch or hacked together in the last couple of weeks.
- Gaiters
- Tyvek rain mitts
- Dyneema rain skirt/multipurpose tarp
- Gravity fed water filter
- …and a Trekking Pole Selfie Stick!

1. Gaiters
Gaiters are these nifty little covers for your trail runners that look like Spats. They keep the rocks, dirt and undesirable things out of your shoes and keep your laces tied.
On that long hot Afton hike, one of the gals I was hiking with had some lighter weight gaiters on. I admired them and also thought to myself “maybe I could make those? ” The gaiters I got at a gear swap are a heavy wool-type material and may have contributed to my hikers rash that day by holding in the heat.
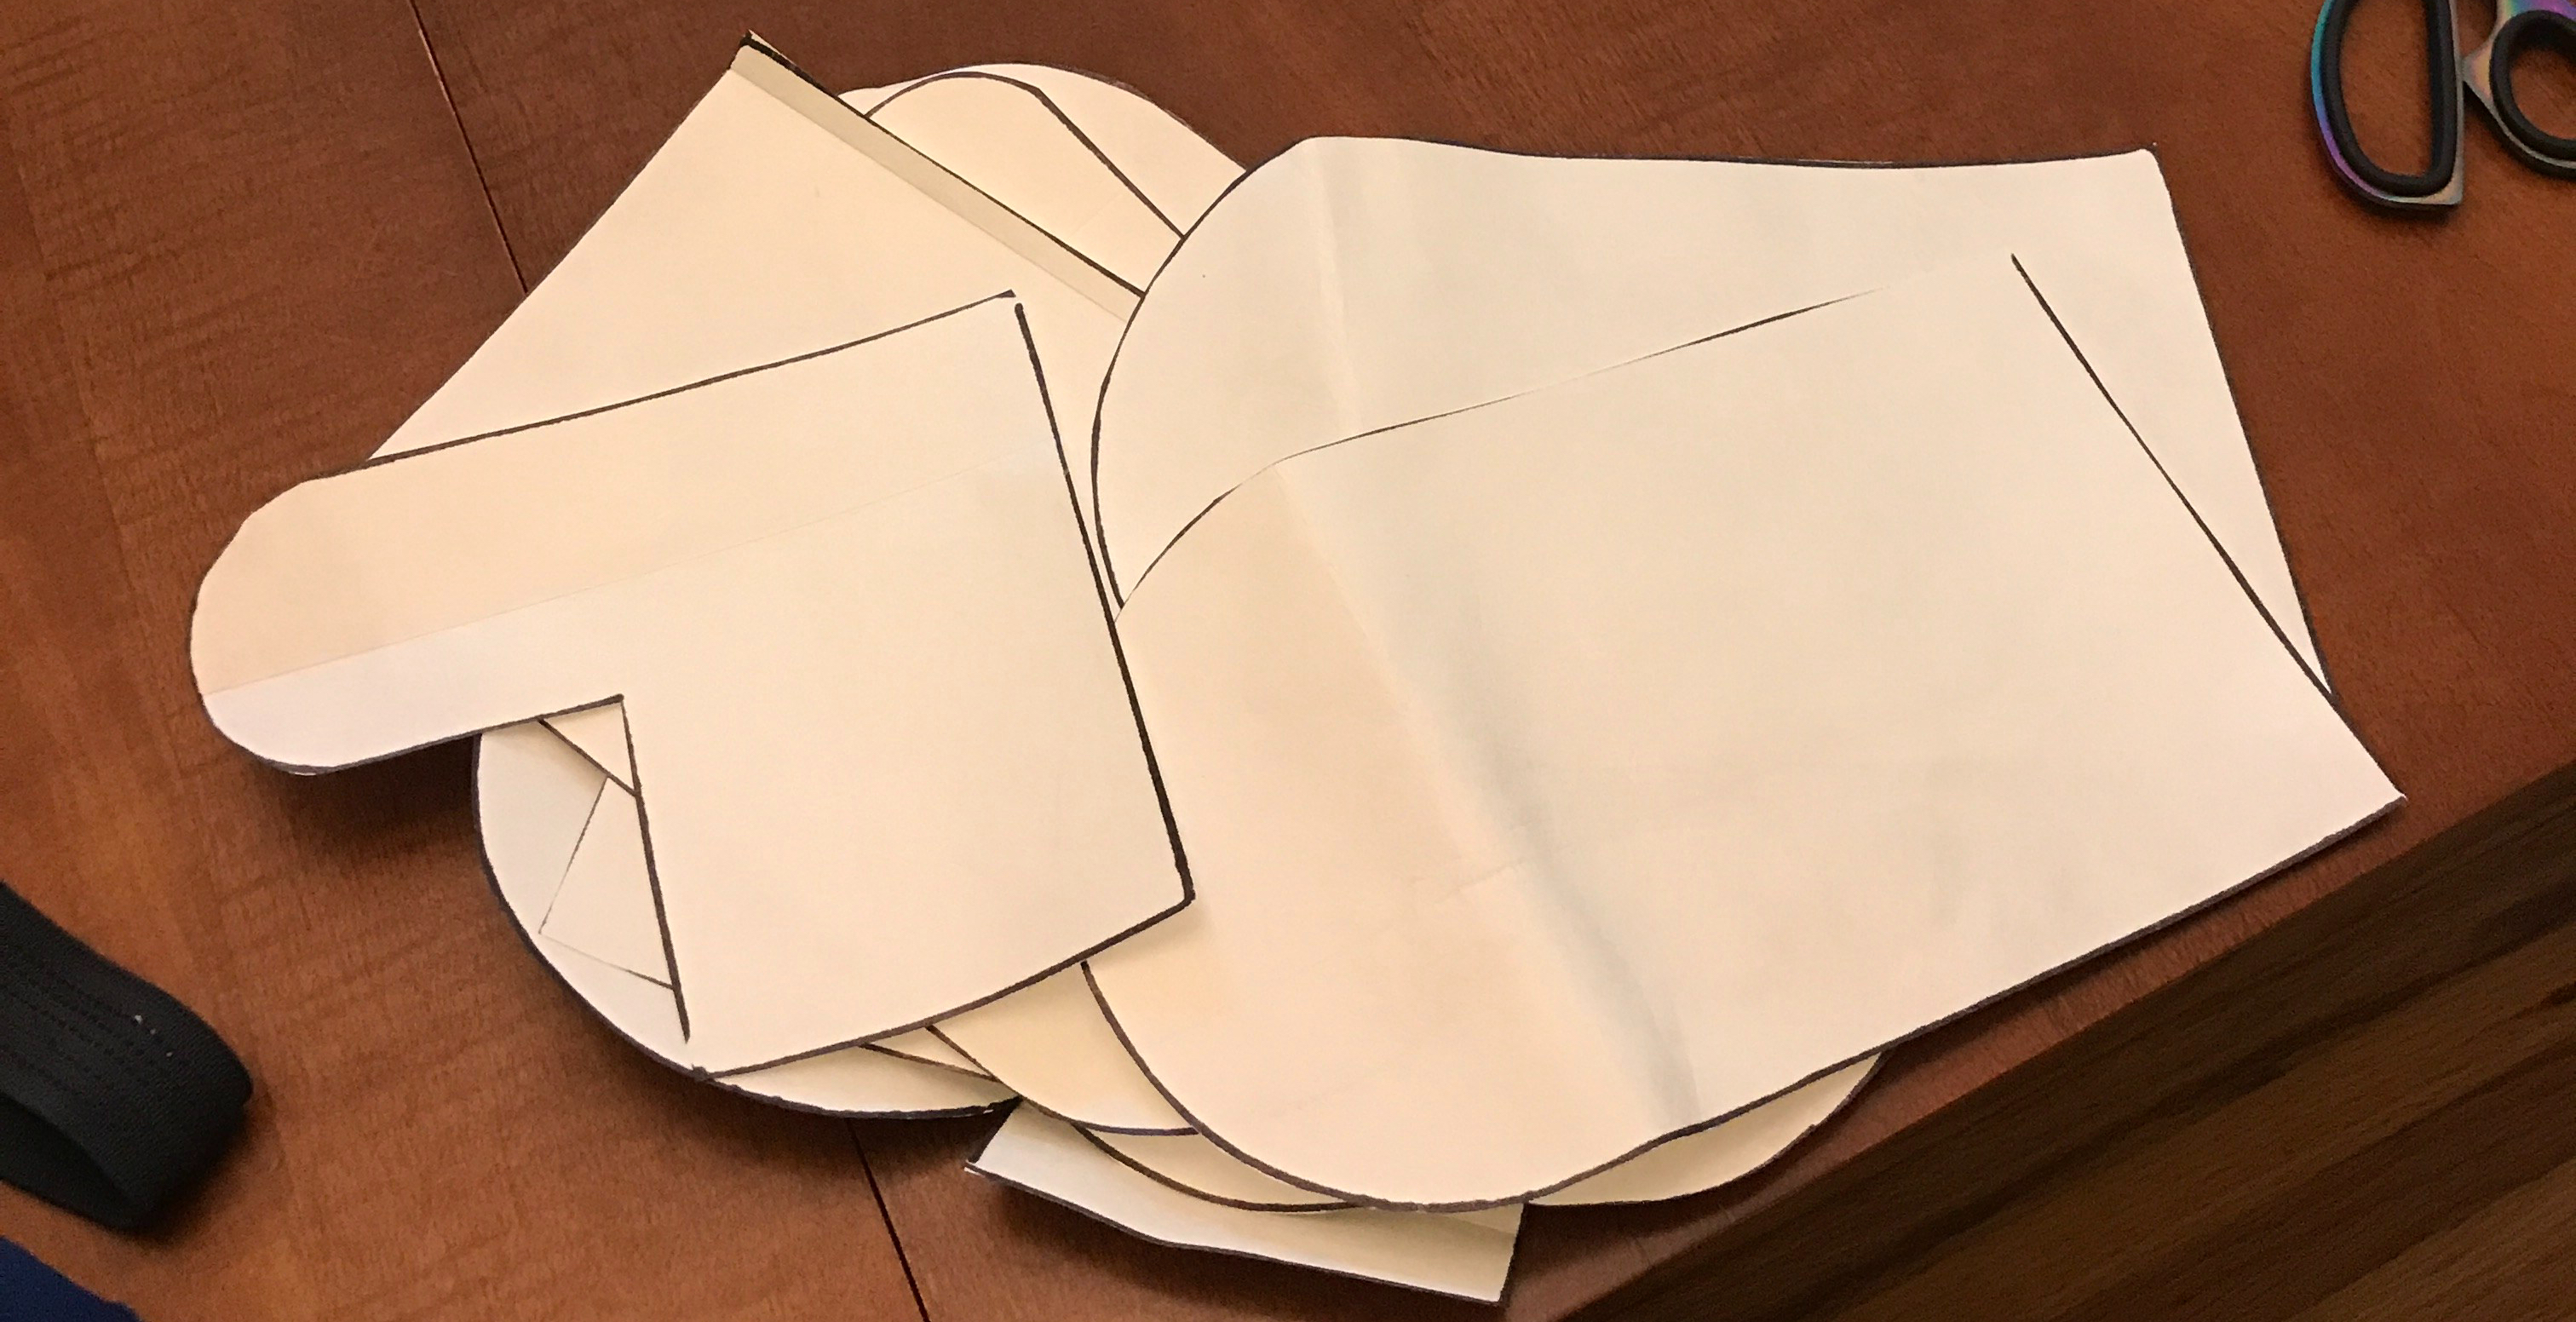
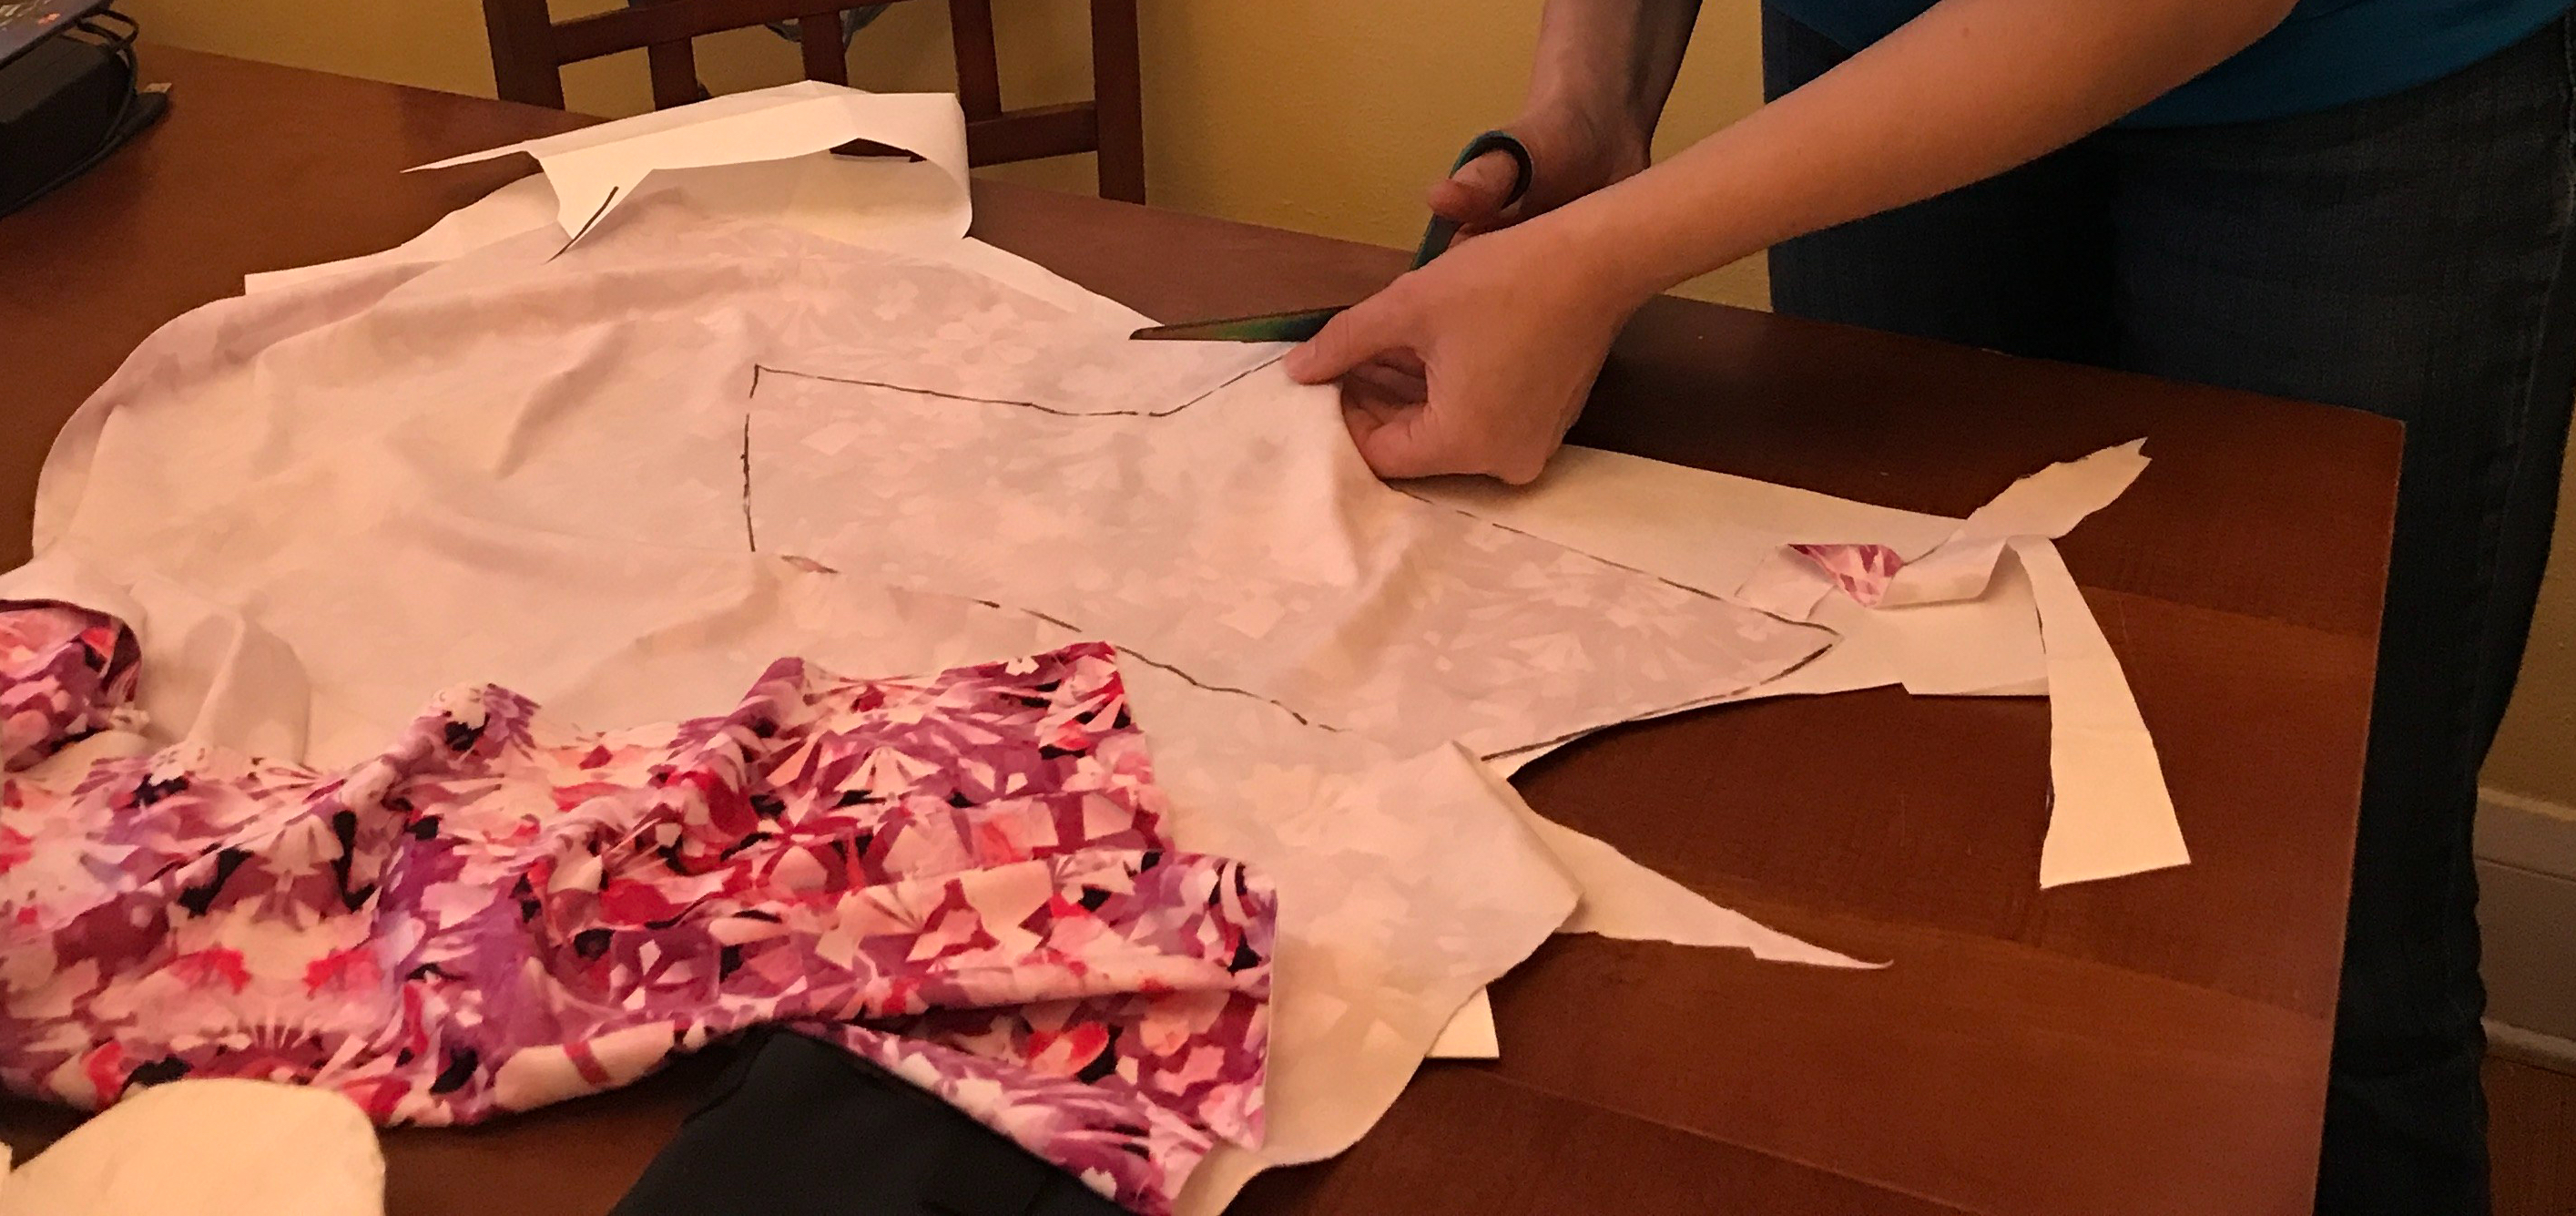 So I went to work on an idea with some fabric that I had rescued from the trash a couple of years ago and called a friend who is an excellent seamstress. We basically made a pattern by wrapping paper around my shoe ankle/arch area, drawing and cutting until we had a shape that we liked. I was thankful she brought over her fancy machine and ended up adjusting the fit of the arch by hand stitching a strip of elastic to the seam the next day.


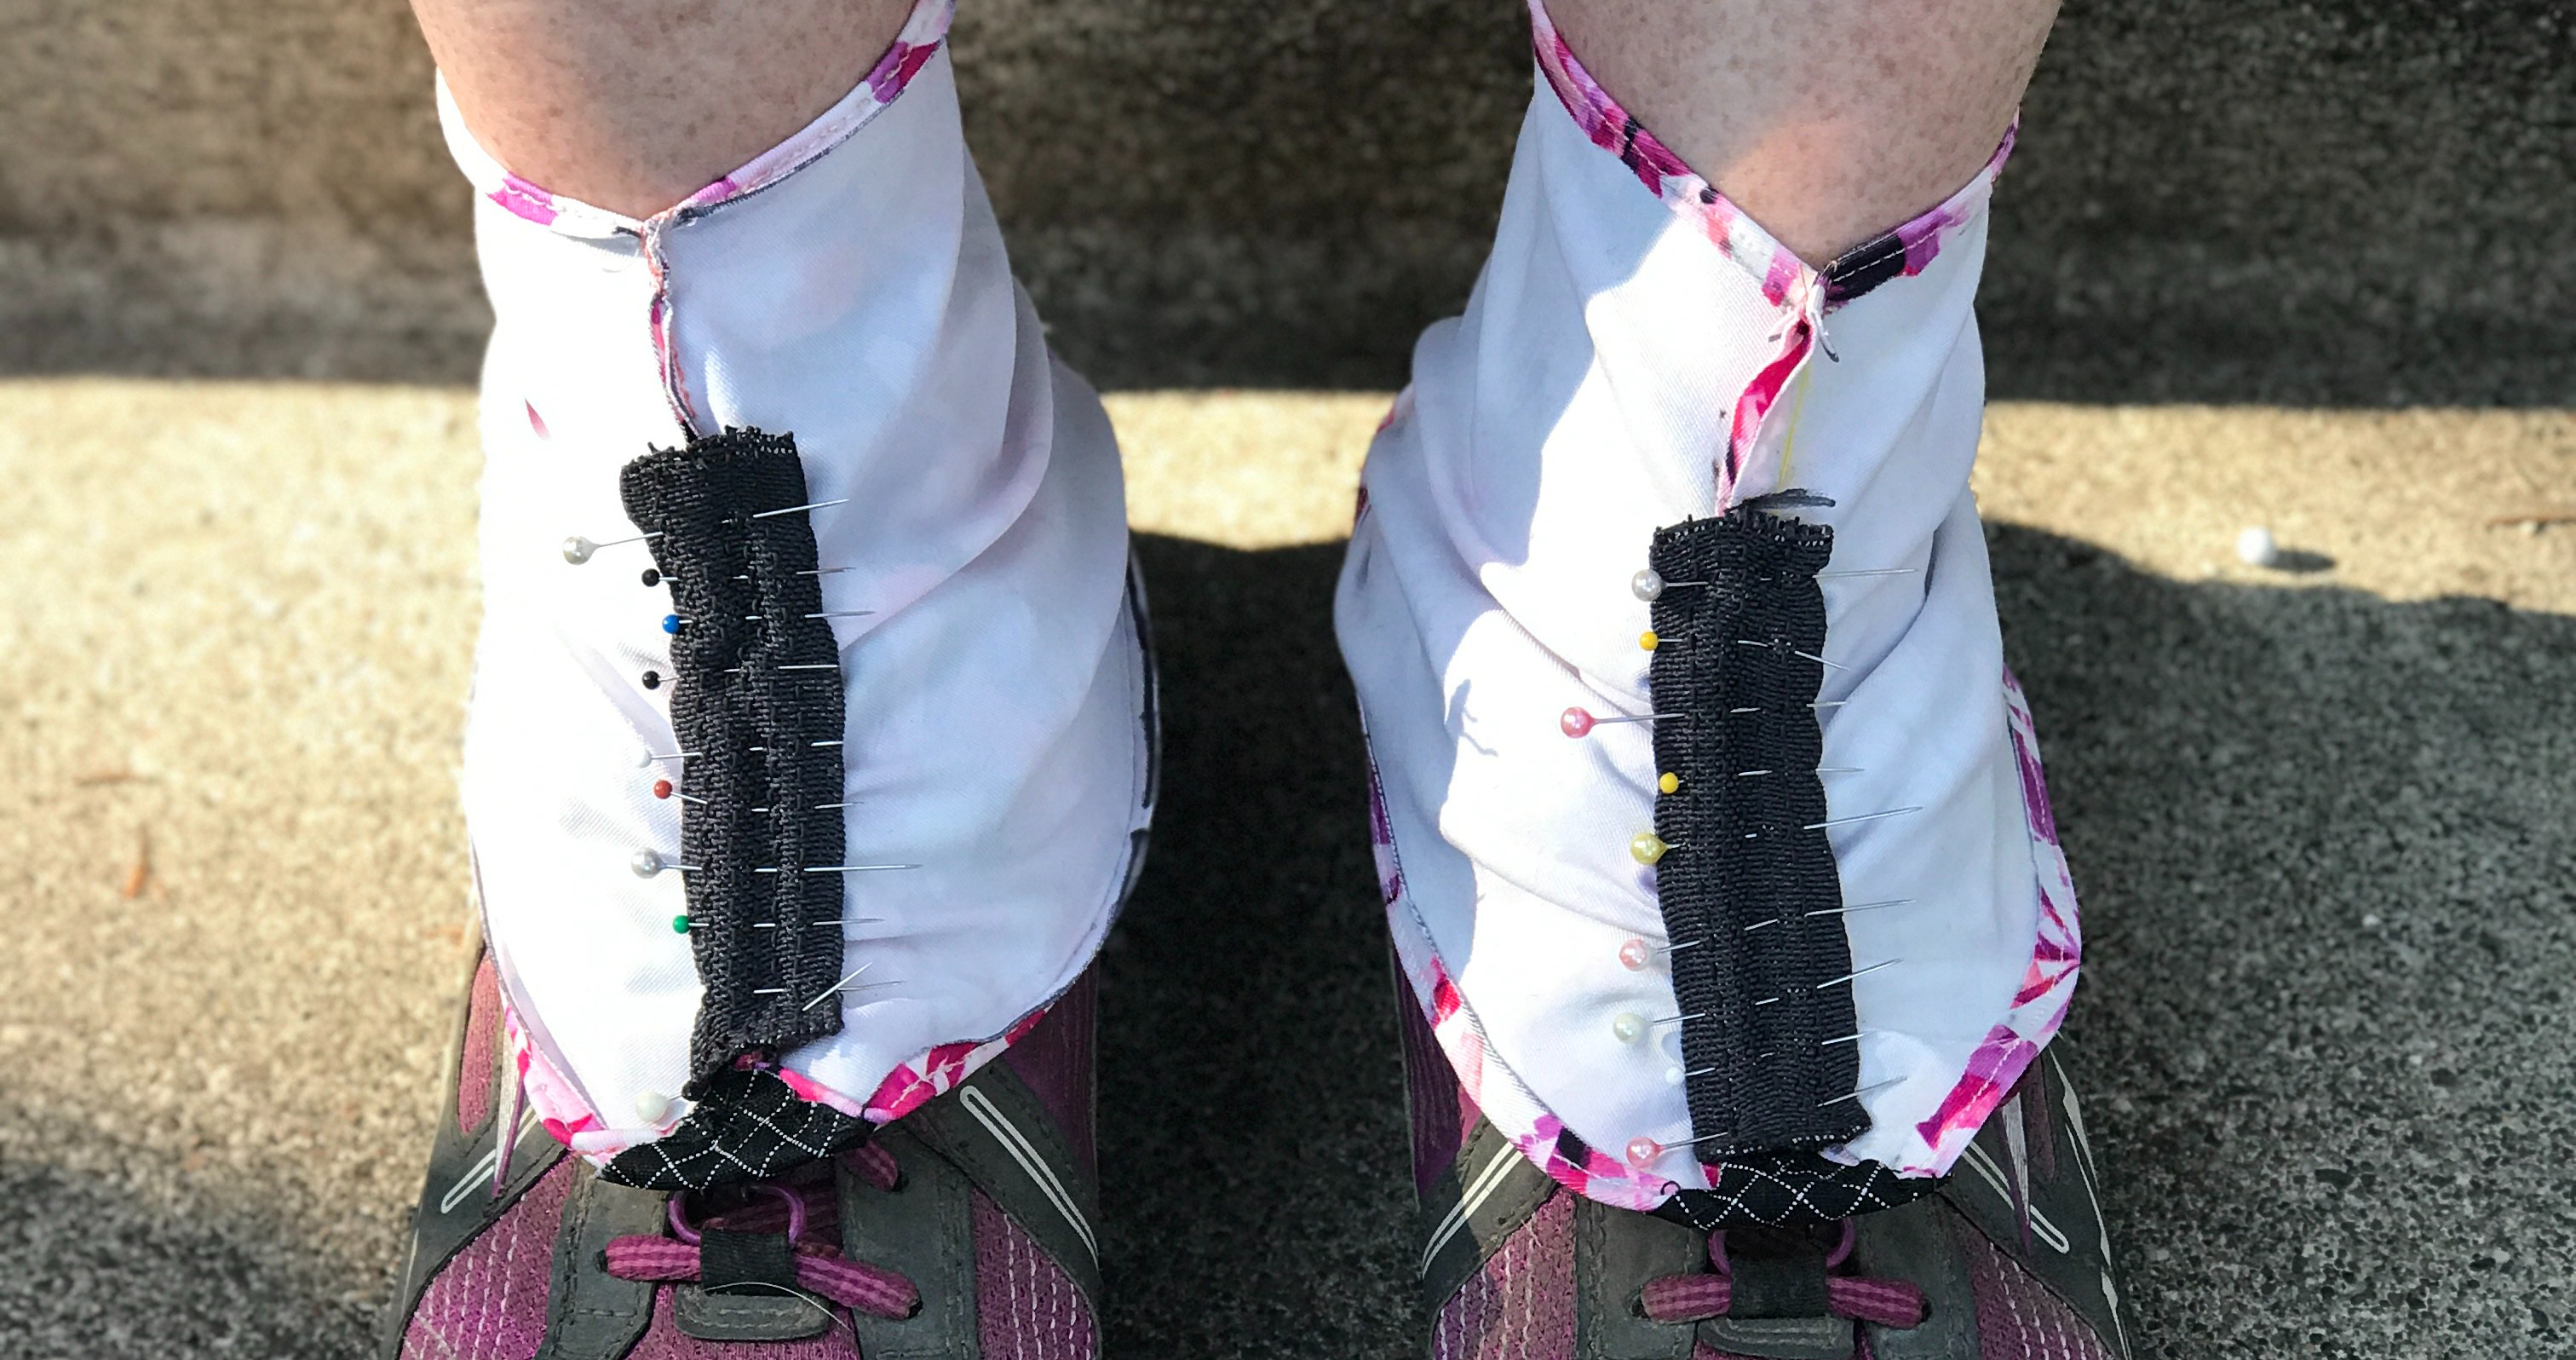
Here’s what we did:
- Make a pattern
- Fold in half and sew the ends together
- Sew a 1/8″ hem on the top and bottom. Reinforce where it joins the center seam,, you don’t want to rip it while you put them on.
- Add Velcro tabs to the back. Some shoes, like mine, come with a velcro gaiter catcher. If yours don’t, you can add one easily with velcro and a few hand stitches to your shoe (don’t be afraid to sew onto your store bought gear….you paid for it!)
- Add Metal Hook to the front to catch onto your shoelaces or gaiter loop (if your shoe has one) I just bought the biggest dress eye hooks I could find at the fabric store and opened them up a little with needle nosed pliers
 Materials:
 Materials:
Lycra/spandex material (upcycle something)-FREE
Eye hooks-$3
Velcro (non sticky kind) -$4
Elastic for arch of foot – (I upcycled a stretchy headband) FREE
Total cost: About $7 (could be 100% FREE if you upcycled stuff laying around the house)
Trail Test
I tested these on a weekend trip on the SHT two weeks ago and I think they’ll work fine the only downside was that I got lazy and I just stuck the Velcro on with the adhesive it came with instead of sewing it on because I found it difficult to get the needle through the sticky adhesive in the fabric. I later stapled them to the fabric just because it was nearly impossible to sew through…So, don’t buy the sticky kind, It’ll come off and it’s hard to sew through.
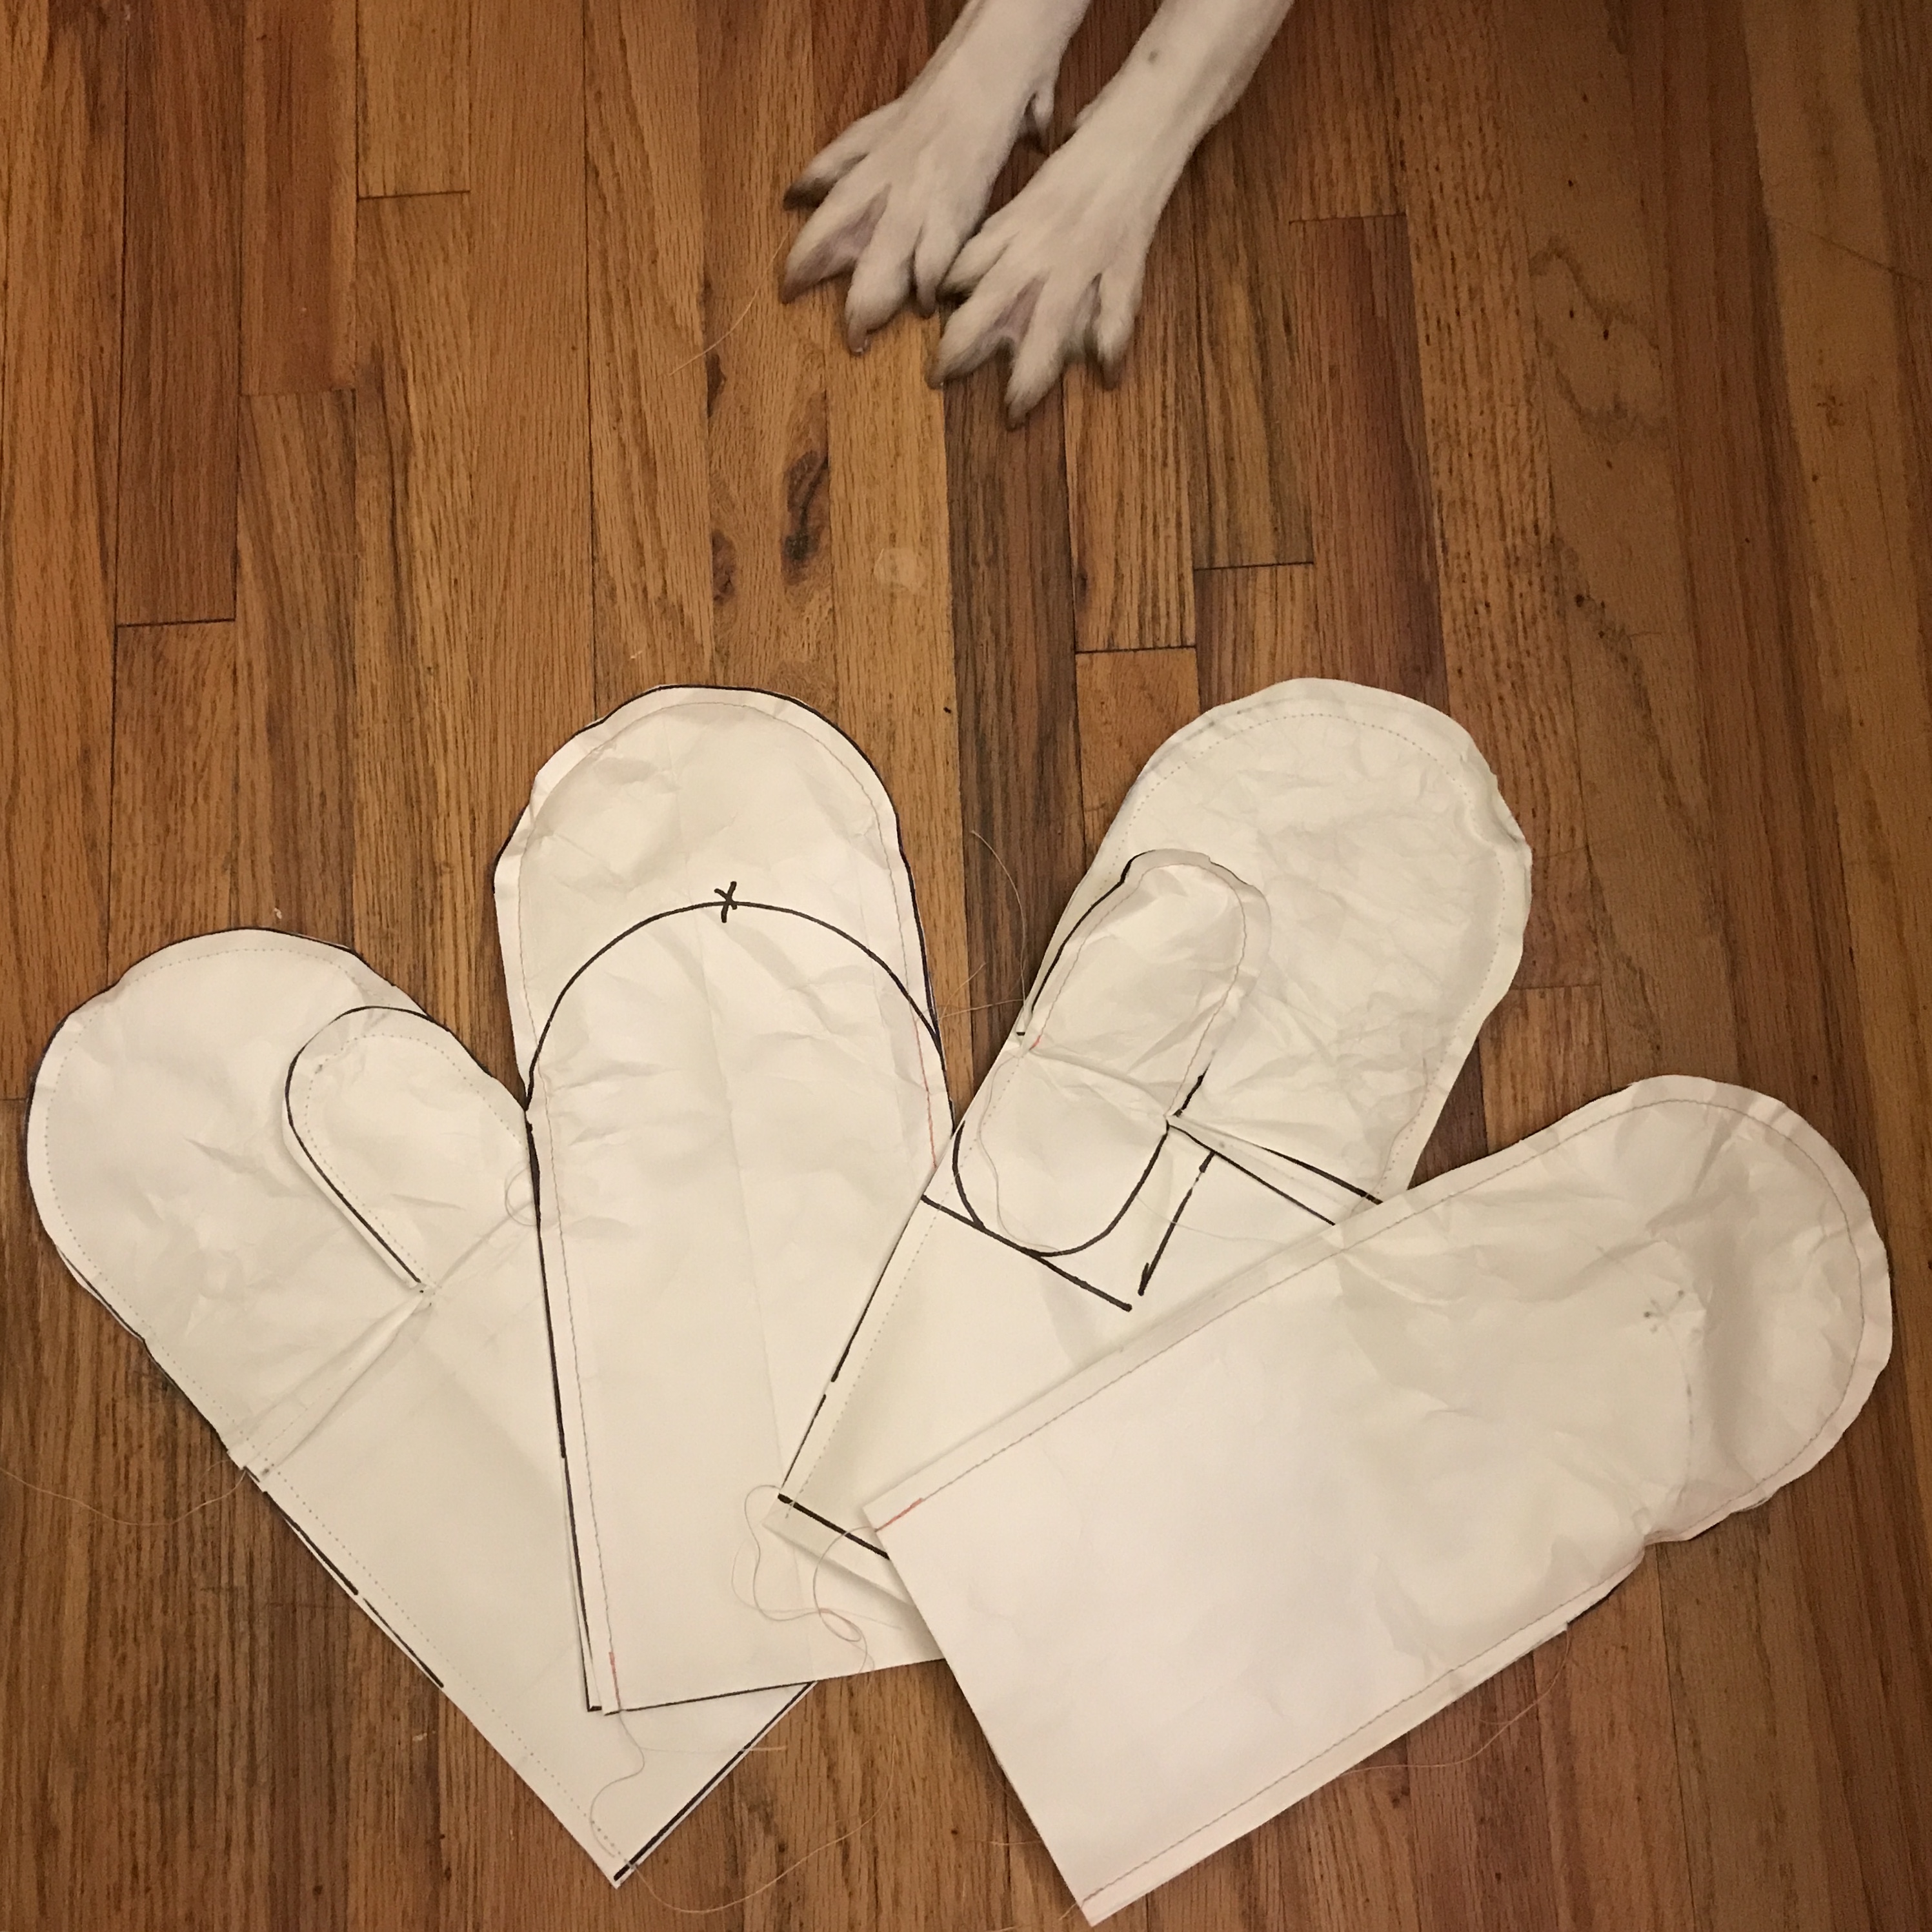
2. Tyvek Rain Mitts
Rain Mitts, from what I can gather, are a lightweight way to protect your hands from cold and wet while they must be exposed (like when using trekking poles).
I had never heard of these until I saw them on someone else’s packing list. I’m still curious about them and seemed like they could be made out of a Tyvek mailing envelope. Luckily my friend that helped me sew the gaiters also makes recycled felted sweater mittens as Christmas gifts and has a lot of experience sewing mittens. So she used her basic pattern and we cut the wrists a little longer to offer more coverage.
 Materials
 Materials
Tyvek mailing envelope (Fed Ex, or other)
Total Cost: FREE
Trail Test
I haven’t used these in the rain yet and they’re just a little bit tight in the thumb. I will let you know how these work, but so far, the weight penalty is so insignificant that I’ll still probably bring them along on our trip.
3. Dyneema Rain Skirt/ Small Tarp
Dyneema or Cuben Fiber fabric is a composite fabric that is very light weight and supposedly as strong as steel. Its very popular in the UL Backpacking crowd and I mostly see it used to make lightweight bear bags.
Materials:
1/2 yard .34 oz Dyneema/Cuben Fiber Fabric–FREE for me, normally about $16
Shock Cord- Free – had some from another project
Velcro -Free (had from gaiter project)
Total cost: FREE but this could easily be made for under $20
Trail Test
I tested these on out SHT Shakedown and since it didn’t rain much I found it most useful as a small tarp or overnight pack cover. More testing to be done here but my primary reason for exploring a skirt instead of pants was to reduce weight and I’m hoping that it won’t be very rainy on the trail in September.
Note about Dyneema Cuben Fiber Fabric: This composite fabric appears on all the ultralight forums and it is highly regarded for strength as well as lightweight properties. I won a contest on Instagram for some free fabric from Ripstop by the Roll and was able to get a chunk of Dyneema fabric as part of my prize. Since I wasn’t sure what I was really going to do with that yet I was hesitant to cut it up so I wrapped it around myself and realized it would probably make a pretty good rain skirt and or multipurpose small tarp.
4. Gravity Sawyer Nalgene Water Filter
One thing my sister and I learned on our shakedown trip was how time consuming filtering water for two people can be with a mini Sawyer Squeeze.
We had planned on using two filters, but the Sawyer full-size squeeze that I brought on our shakedown had some suspicious looking mold growing in it that I didn’t see before the trip. I ended up thoroughly cleaning my Sawyer when I got home and still wasn’t satisfied with the amount of time it took to squeeze the water out of the bag. A couple of ladies on our trip had gravity fed filters and I remembered how great the 6 L filter was on our Isle Royale trip with Scouts. After looking online for options, I decided that I could probably figure something out with the stuff I had at home.
Materials:
Sawyer Personal Water Bottle – Thrift store $2.99
Nalgene Canteen 3L – $20 -I have had this one for about 2 years
Sawyer Squeeze Accessories- Rubber hose and Bottle attachment. Came with my Sawyer that I got at a gear swap for $10
Total cost: I just used stuff I already had laying around the house, but you could get this set up for about $50
Trail Test
My sister actually came up with this idea first and figured out a way to hook her camelback up to her Sawyer mini. The water initially came out very slow, but we fixed that by loosening the clean water connection to let a little air into the clean bottle and relieve the vacuum that is naturally created. The whole set up is maybe a little more water than I need, but it only weighs 7 ounces and the added 3 oz is worth the weight penalty to be able to filter quickly and be able to carry more for cleaning and cooking if needed.
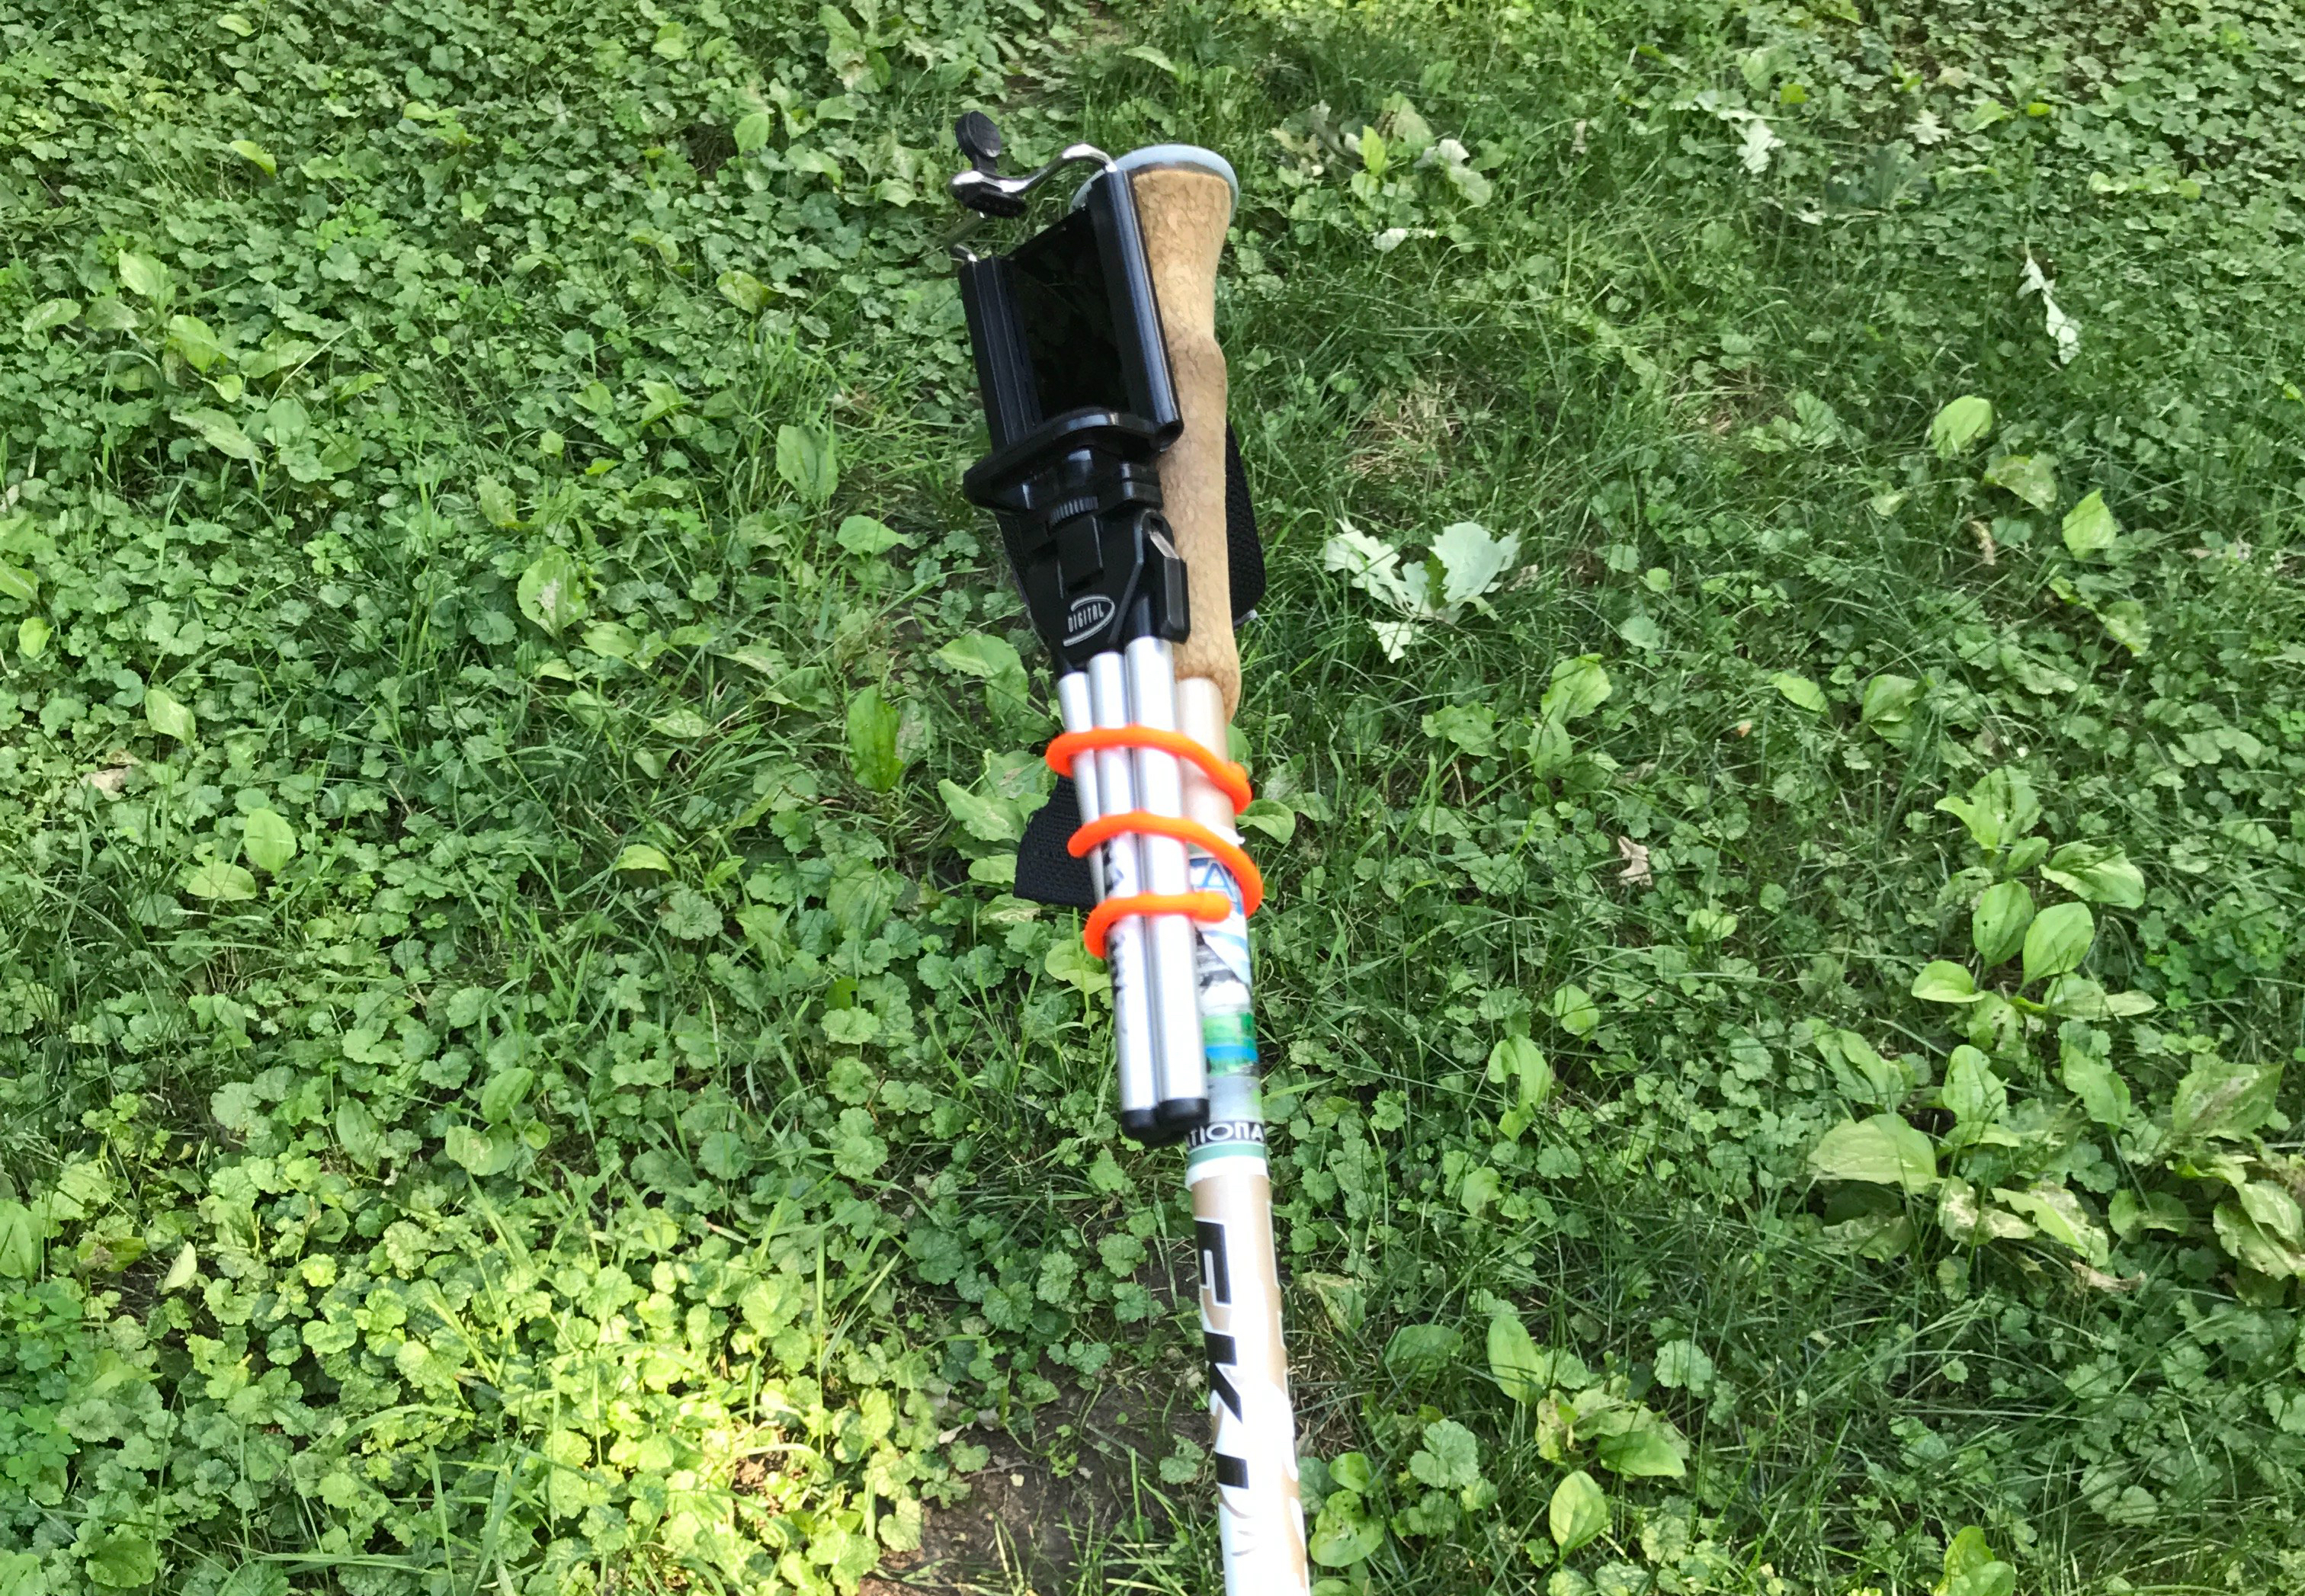
5. Trekking Pole Selfie Stick hack
I wanted a way to take video and photos with a selfie stick, and tripod without carrying both….the stick seemed duplicative and weighted a few ounces I didn’t want to carry. I also discovered that the top piece of a cheap selfie stick came of and fit onto a tripod we had and went from there.
Behold the birth of the selfie trekking stick!

Materials:
Nite Ize Rubber Twist Gear Tie – got mine at the thrift store, velcro straps would also probably work and weigh less.
Lightweight phone tripod-cheap
Disassembled Selfie Stick – Cheap-o
Total cost: Again, I just used stuff I already had laying around the house, but you could probably get this set up for under $20

Trail Test
I took this group photo on our shakedown trip and it worked great. The trick is to set your phone to a timed photo, then extend the stick out vs. clicking a selfie stick button to take a photo. It was also nice to keep the functionality of the tripod for a couple of photos we took down by the river.
Overall, it’s been great to get the creative juices flowing, solve some problems and reuse materials I had laying around or acquire for very little investment. Outdoor gear in general can get very expensive, and ultralight gear is even MORE EXPENSIVE.
3 Final Tips for Lightening Your Load Without Breaking the Bank:
- Buy a small food scale and start weighing your gear.
- Invest and focus first on lightening up the big 3 (Backpack, Tent, Bag/Quilt). These should be under 10 lbs. Less is better.
- Experiment, shop at thrift stores, online used gear sites and reuse as much as you can. Reading this book helped me a bunch!
Thanks for reading! Shoot me a note in the comments if you have any questions about how this gear was made (I didn’t get too deep into the details) or have a great suggestion you’d like to share here. Next post will focus on FOOD….with FREE recipes and how to tips!
Happy Trails!
~WP
Wandering Pine is reader-supported and some of our blog posts may contain affiliate links. Learn more here.
Thank you for your support!
Reblogged this on .
If you know of anybody that does upholstery they will have a larger machine that can get through that Velcro on your home made Gaitors. I am now considering making my own after seeing yours. The pair I have are zippered in the back. If the Velcro is water proof it’s definitely lighter and faster to put on and take off. Let us know how they hold up over the long haul.
Thanks! Thats a great tip!! I stapled them and am hoping for the best. I have a needle and thread in my repair kit, so if they blow up on the trail, I can suffer through stitching them in the field. 🙂 Be sure to report back on your gaiter making experience. I love seeing people make their own gear!
I made my own gaiters a few years back and it was surprising how easy it was! I have been thinking about making rain mitts and hadn’t figured out the material yet. You have inspired me to get to making my own as you did. Thank you!
Sweet!! I love hearing people’s DIY gear stories! I’ll let ya know how the mitts work out on the trail! 🙂