
Wandering Pine is reader-supported. When you buy through our links, we may earn an affiliate commission at no additional cost to you. Thank you! Learn more.
There are so many options for pre-made dehydrated meals , but making your own trail food doesn’t have to be hard and you’ll feel proud that you did it yourself!
Its been a couple of weeks since my marathon food prep weekend for our thru hike of the Superior Hiking Trail and I’m excited to finally share my planning and food prep process….unfortunately, I kind of did things backwards and didn’t do a great job of keeping track of what I put together, so no recipes. (Update: you can check out this post for a 5 day menu and three of my favorite recipes)
Planning to feed myself for 3 weeks on the trail started with good intentions but got a little fragmented due to some unexpected family events. In the end, it all turned out fine anyway. Proof that you can design and execute a perfect plan or can throw together a backpacking meal out of a combo of store bought ingredients and still survive.
It has been said that hunger is the best spice, so I’m totally going with that!

Step 1: Do your research
I started by meeting with the same friend that helped me with a few DIY sewing projects from my last post. My friend is a total foodie and planned all of the meals for our epic Isle Royale Backpacking Trip with the Scouts. We made over 300 dehydrated meals together to feed our large group, and everyone survived!
This same friend also generously loaned me all of her backpacking cookbooks as I prepped for this trip. Two favorites were Lipsmackin’ Backpacking and Recipes for Adventure. Both books had simple recipes that I could imagine myself eating, and easy directions.
Lipsmackin’ Backpacking is the only book I’ve found that has nutritional information going beyond calories. Other books out there may have this, but this was the only one I saw with this feature and I found it useful since I wanted to be more mindful of caloric intake and protein on a longer trip.
UPDATE: Backcountry Foodie is another highly respected resource that has dietician created recipes and meal planning tools for backpackers. Check it out!


The Backpacking Chef’s book was my favorite in her collection and I ended up buying a copy for myself. It is a concise, very simply written book with lots of pictures. Most of the book’s focus is on drying, storing and assembly techniques that helped me get my brain around a menu plan.
 Step 2: Get your Ingredients
I ended up doing this step kind of backwards. I started picking up trail snacks, dry goods and some canned items on grocery store trips weeks before I had a menu or started my food prep. I ended up having a bit of a stockpile to choose from and this is ultimately what prompted me to NOT use any recipes from the books I read. I decided I would try to use the knowledge I had gained from these resources, make meals out of what I had in the house, track the calories and fill in the gaps from there.
 If you want to start making your own dehydrated meals, some versatile and accessible staples to have on hand are:
- mashed potatoes
- couscous
- instant oatmeal
- instant rice
- nuts
- dried fruit
- soup mix (Knorr)
- ramen
- pasta
- dried vegetables
- powdered milk/protein
- dried onions
- spices
Meat and other ingredients can easily be added to these basic items for quick and nutritious meals.


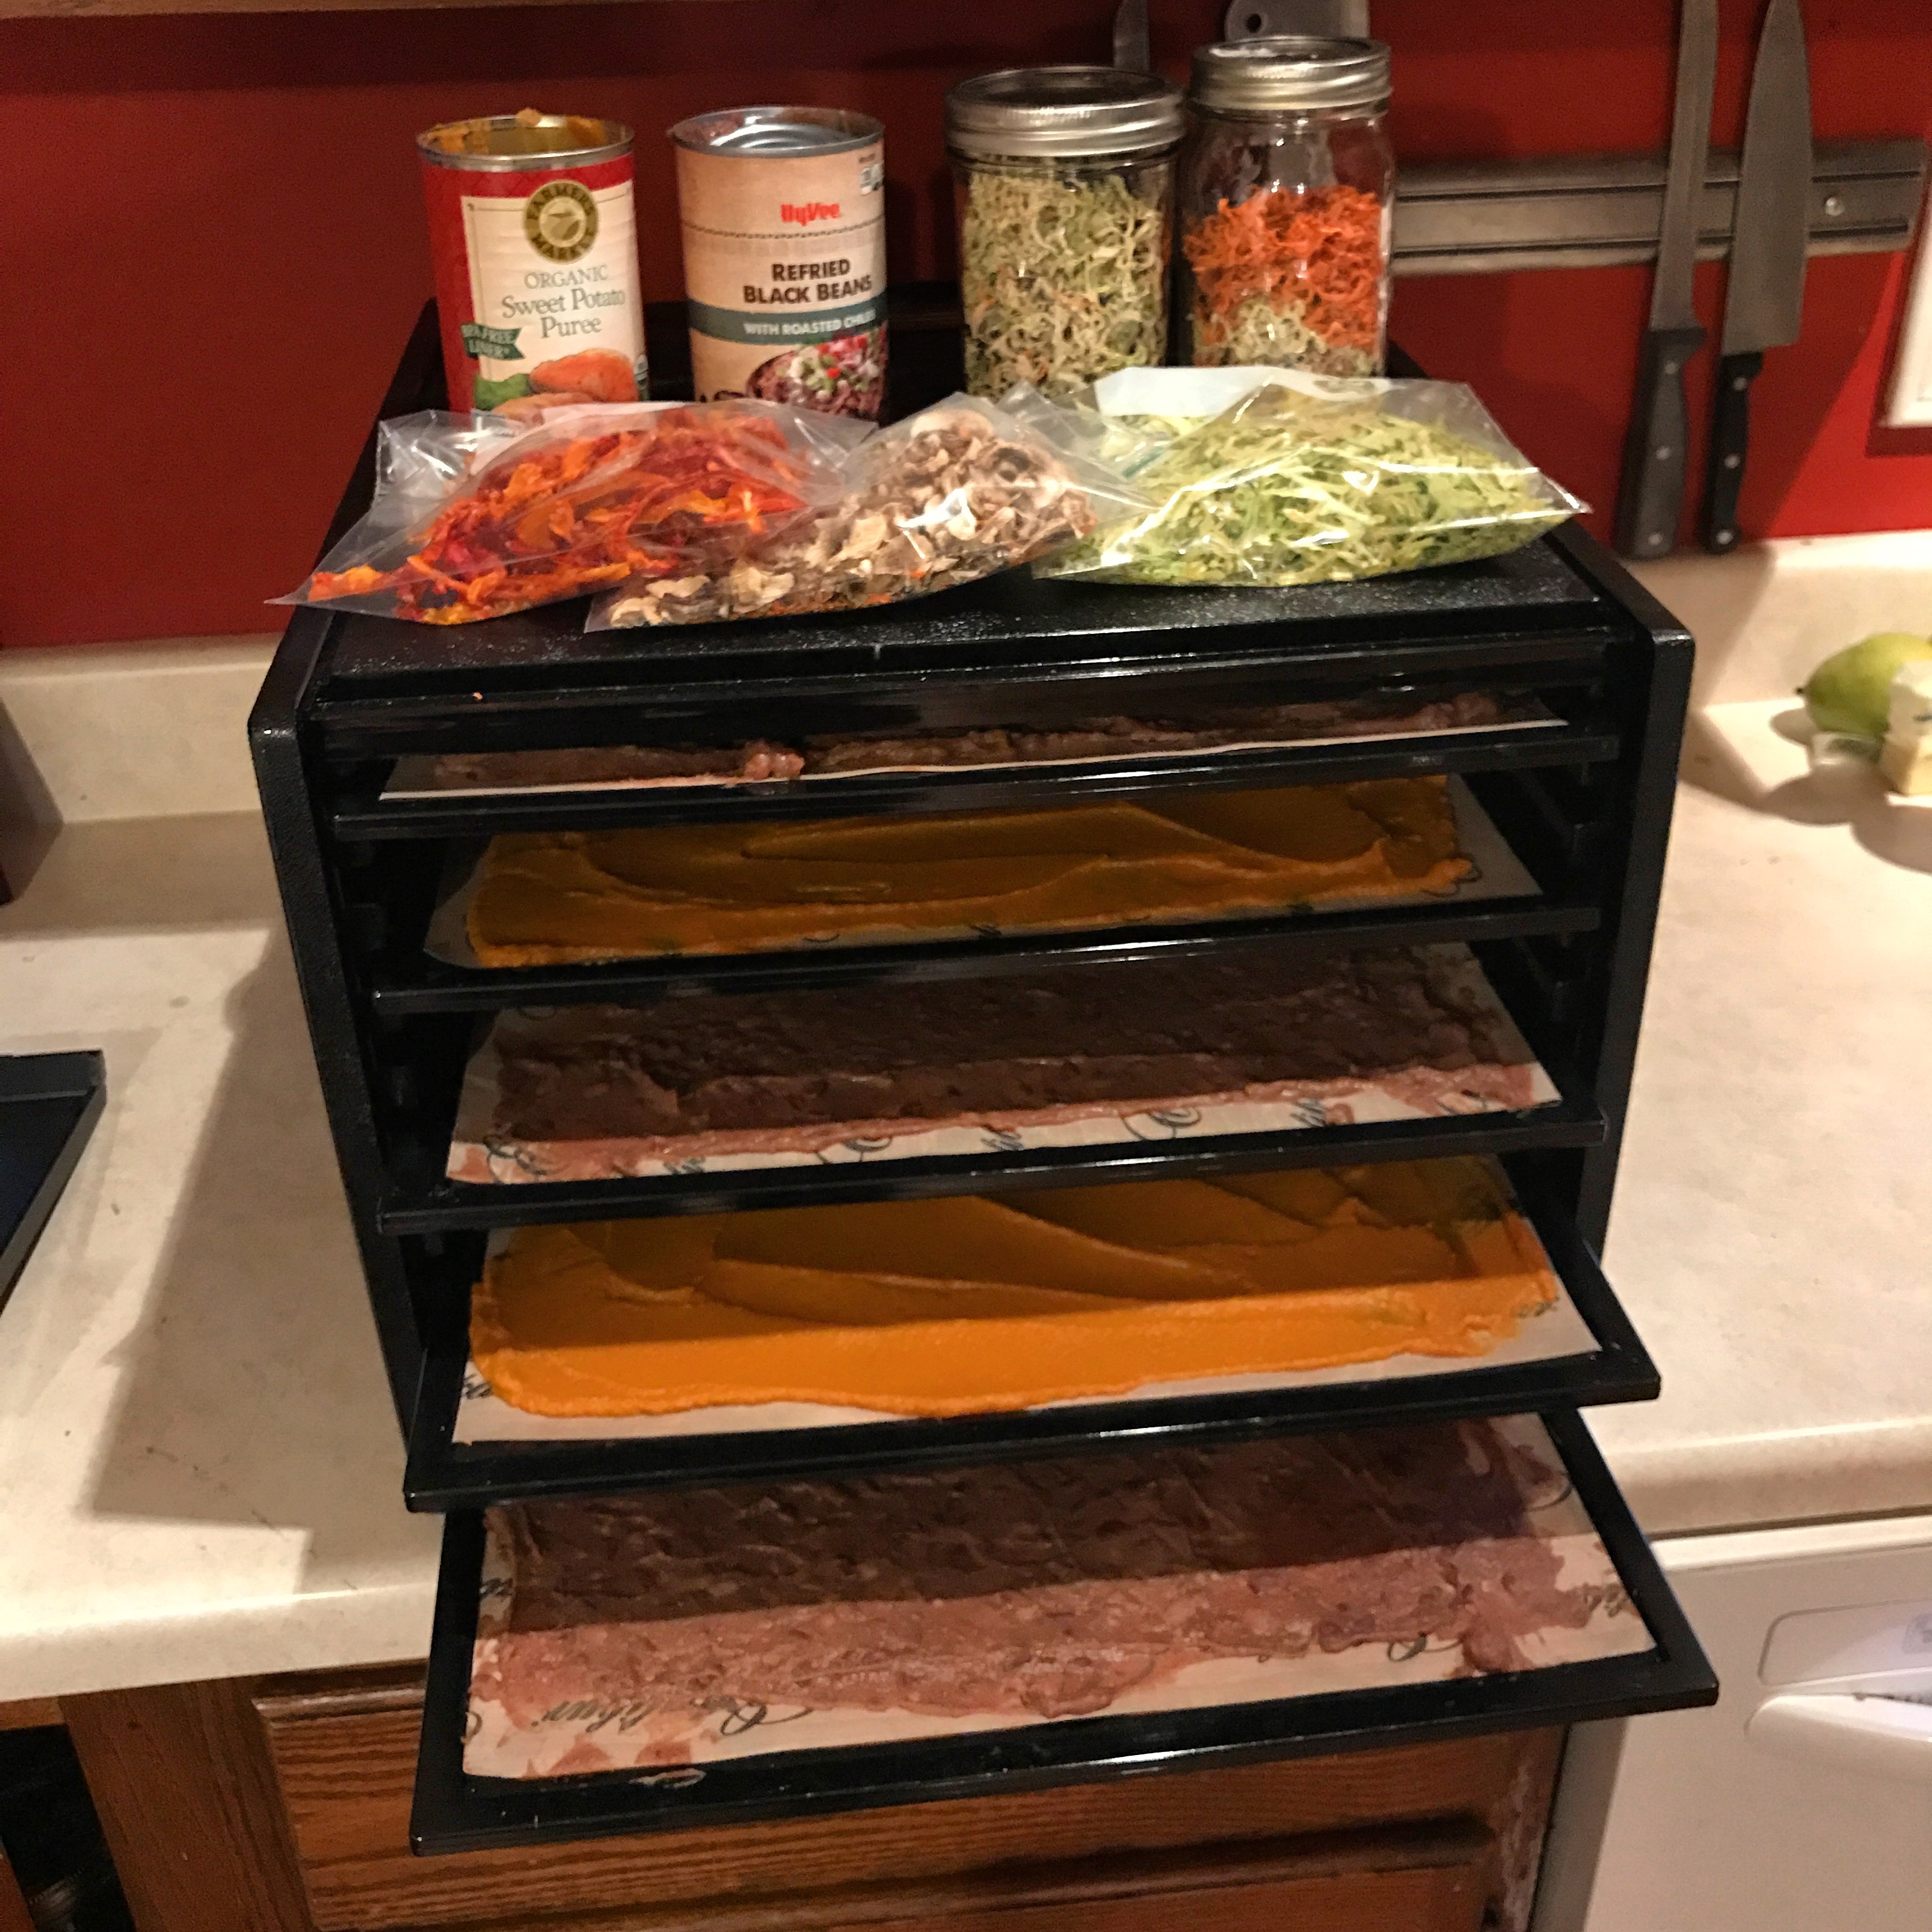
In addition to these ready to rehydrate ingredients, I dehydrated:
- canned refried black beans
- canned sweet potatoes
- cabbage (shredded coleslaw mix)
- shredded Carrots
- tomatoes
- shredded zucchini
- spinach
- mushrooms
- bell pepper
- canned chicken
- ground beef
- cooked macaroni
 Step 3: Dry it, you’ll like it
Having a menu would generally precede buying and drying ingredients…but, like I said, I kind of did it backwards.
Many foods can be dried in the oven or even in the sun, but for the best results that preserves the most nutrients, a food dehydrator is the way to go. For this trip, I borrowed an Excalibur dehydrator and eventually found one of my own that was gently used. My favorite 20+ year old Harvest Maid came from the thrift store and I ran that thing into the ground. Garage sales and other online marketplace sites are also a great resource if you want to purchase one of your own. You might even have a friend or family member that has one sitting in a closet somewhere gathering dust, so ask around.
Its important to start with a clean machine. Especially if you are borrowing or buying used. I always do a really good cleaning of all of the trays before I start, even if its just been sitting for a while.
Before my big weekend of food prep, I had started drying a few ingredients here and there after work or overnight to start my ingredient base. My original plan was so slowly work through the food prep over the space of a month with one big assembly day right before the trip. But my husband’s unexpected surgery resulted in 3-4 days at home to care for him and an opportunity to babysit a dehydrator full time and just get it all done at once.
 Step 4: Determine your nutritional target
After I had the majority of my basic staples and dried food on hand or in the dehydrator, I made a plan! Yes, backwards…this should have been step #2.
I DID have the forethought to write down the nutritional information on the food that I had dried, (from the packaging, or looking it up on the internet) so that I could met my caloric needs. This was very important to me, since I had never been on more than a 3-7 day trip or done more than 10mi max consecutive days.


Determining your nutritional needs can be overwhelming if you are not a nutritionist, but it doesn’t have to be. I started by looking at backpacking forums and most of the advice I found there was geared to male backpackers with a totally different metabolism than mine. I saw recommendations all the way up to 6,000 calories per day. I knew this was more than I needed, so I found a basic calorie and protein calculator that referenced ADA, CDC and WHO recommended daily allowance for a “very active” activity level. I’m sure there’s still room for interpretation here but I found the simplest place to start was with internationally recognized nutritional standards.


Step 5: Build your menu
I had great intentions of using recipes from the books from my friend, but truth be told….I’m not very good at following recipes anyway and had to capitalize on the time window I was granted.
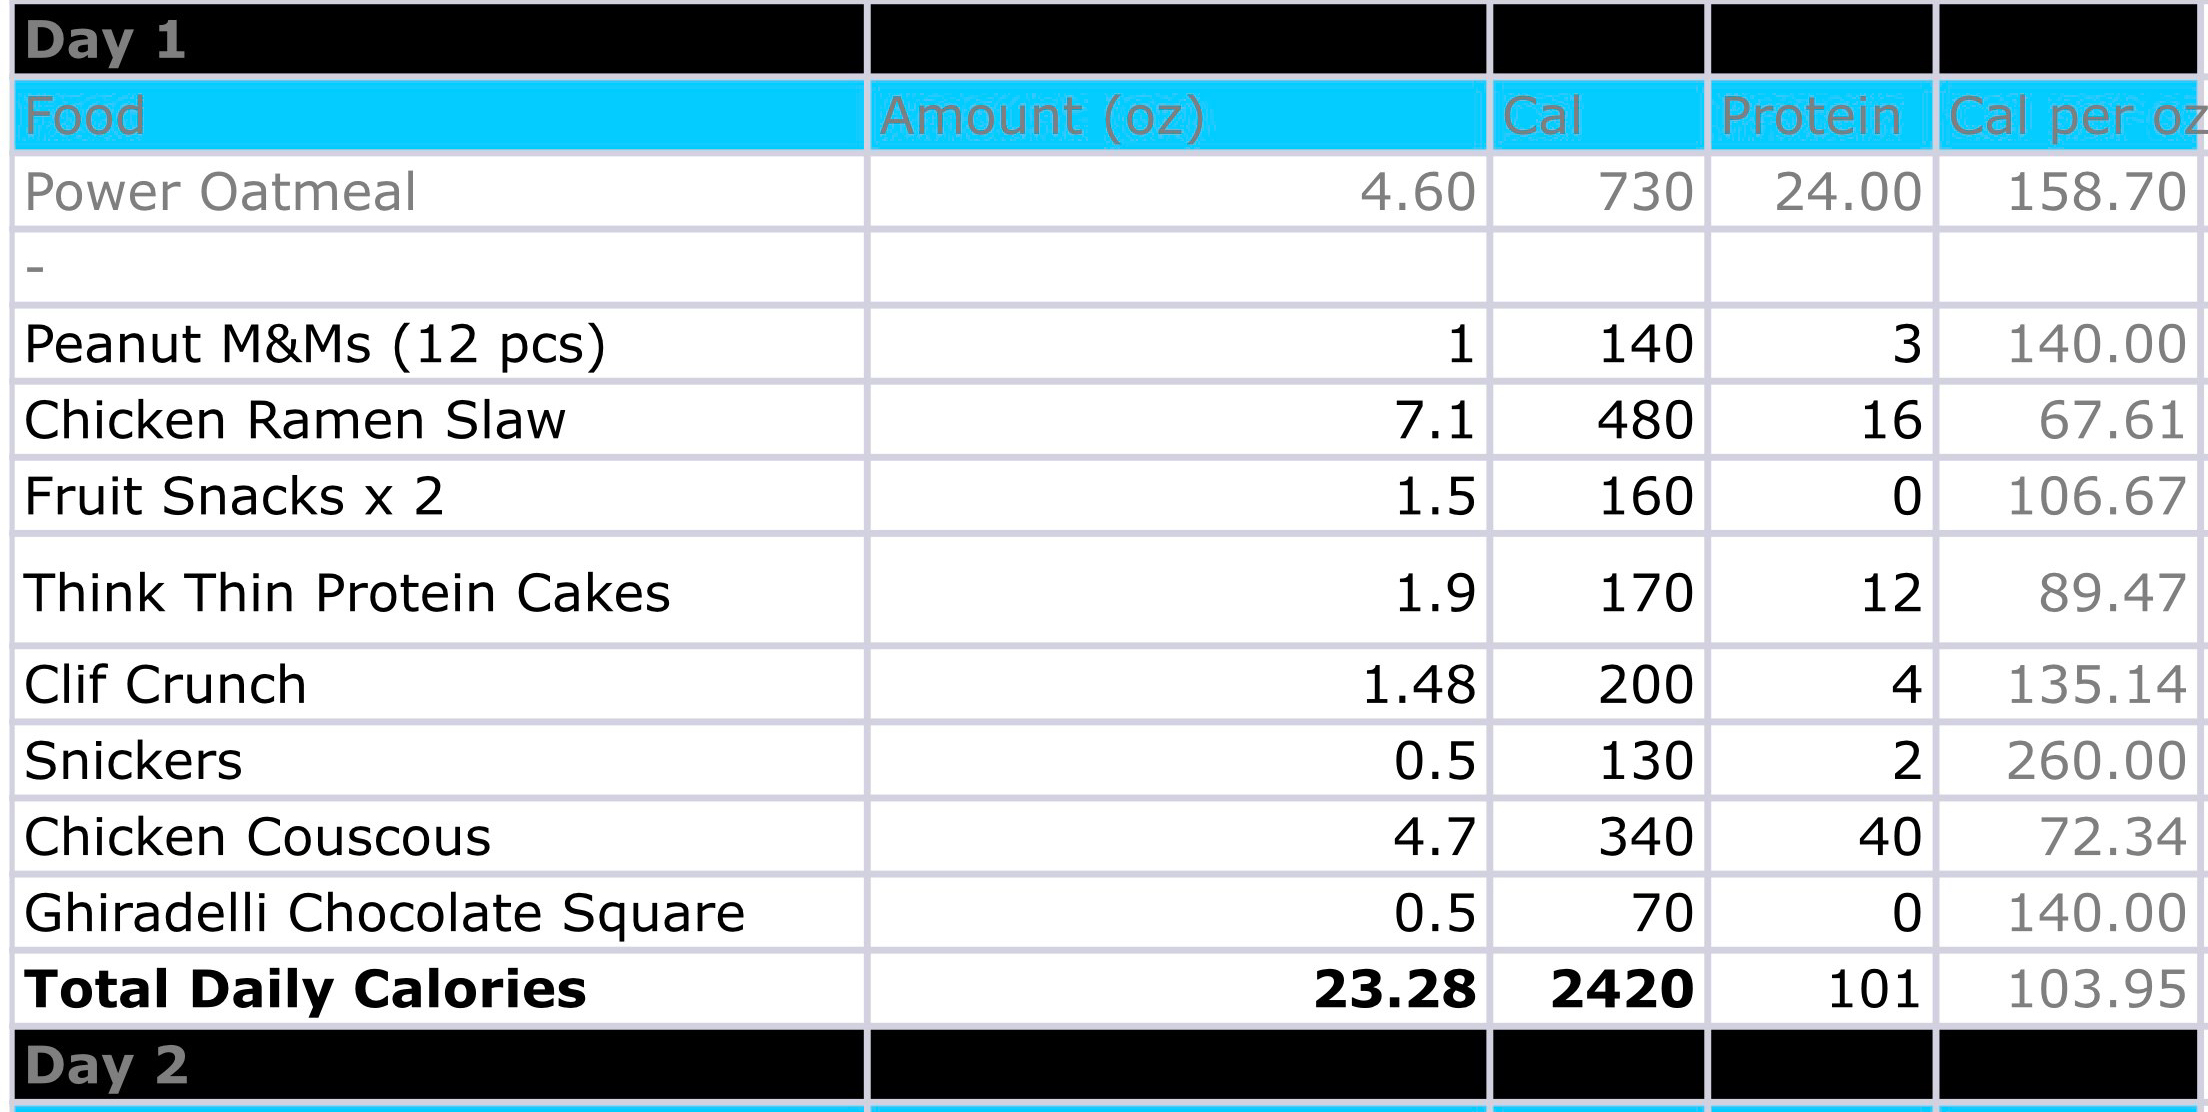
To start the process, I took the basic ingredients I had on hand and layered in my caloric target to create meals that would meet my needs. Tracking this on an excel spreadsheet made it a lot easier and basically turned the task into a math problem.
I was able to come up with 4 servings of 4 dinner options with the ingredients that I had on hand, 3 to bring on the trip and one to taste test.
I then layered in a very high calorie breakfast and high protein lunch.
To make sure that I was meeting each day’s needs, I plotted them out on my excel grid and filled in nutritional gaps with snacks for each day. Each day’s food is packaged separately .
Tracking all of this information might seem like overkill, or overwhelming in itself…but planning my food out and making my best effort to prepare for nutritional needs on the trail beforehand was kind of a relief and helped me feel prepared for the trip.
 For both freshness and as an act of faith, I sealed everything up with the vacuum sealer so I wouldn’t be tempted to mess with anything that I planned out. I haven’t vacuum sealed anything since that trip, but it seemed like a good idea at the time.
Update:
Food is a critical component to providing fuel and comfort on the trail. What we eat or choose to bring is incredibly individual and I lean more towards comfort foods and even repetition of my faves when I’ve had a long day on the trail and just want something that I know will taste good and fill my belly.
In the years since the original writing of this post, I have worked on further optimizing my nutrition, reducing single use plastics and trying not to overpack snacks (I will probably always work on this…)
Hope you found this post helpful as you consider making your own dehydrated meals. Be sure to check out the resources at the very bottom for more useful tips. Got any good recipes or resources to share? Favorite pre-made options? Shoot me a note in the comments or join the Wandering Pine FB or IG to continue the conversation!
Happy Trails!
~WP
Resources:
Backpacking Meal Planning + 3 Favorite Recipes
Backcountry Foodie : Dietician Created Recipes and Meal Planning Tools for Backpackers The Backpacking Chef: DIY Backpacking Food
Great post! Alaskallamas.com
Thanks! I want to visit Alaska!!
Great post with great suggestions on DIY dehydrated meal production/packaging. I commend you on your efforts. I just seem to be stuck on the high protein versions of Mountain House (MH) meals along with high protein energy bars. I once wrote MH, complaining about high sodium levels, then realized it all got sweated out along the trail anyway. And I like the MH cooking process (boil water) and clean-up process (eat everything and roll-up the empty pkg/put in plastic bag and carry out) Call me lazy… yet, more power to you, and your extra efforts! I’d like to say, I bet yours yours tastes better, but we’d have to do a taste-test, to document the fact…maybe at a local brewery with a cook stove out back! 😉 Maybe this fall sometime… a group of folks enjoying a ‘cook-off’ together, recalling the best hikes of 2018! S’mores too?
Thanks Mike! Appreciate it. A ‘best of’ night sounds fun!! I’ll leave my taco mac recipe for the garbage man…that one was a flop! Whats your favorite MH meal?
I’ve always liked the MH single servings of Rice and Chicken, Spaghetti with Meat Sauce, Beef Stroganoff w/ Noodles -where they all required adding 14 oz of boiling water. Single servings varied from 7-22 g protein per meal. I’ve avoided the extra spicey, cheezy meals.
Now it seems the MH single serving pkgs. have disappeared, and been replaced by 2-2.5 servings per packet, yet they require less water per serving -weird! A 2 serving pack of Chicken and Mashed Potatoes (22 g protein per serving) requires 12 oz of water. A 2.5 serving pack of Beef Stew (14 g protein per serving) requires 16 oz of water. And a 2.5 serving pack of Chicken Fried Rice w/ Veggies(14 g protein per serving) requires 12 oz of water.
I’m getting hungry reading all the labels. Seems the protein content has been increased a bit, and required water for cooking has been reduced in the new larger portion pkgs. ‘Savor the adventure,’ reads the new labels! Can’t wait! 😉
I drink protein powder mixed in water to help with protein needs on trail. Also, a daily vitamin helps ensure I’m getting good stuff not found in snickers and ramen. 🙂
I like that plan! Sounds a lot easier!
Side comment – two friends recently completed the AT, one lost 38#, the other lost 58#. I don’t know what their starting weights were, but this kind of weight loss demonstrates what five months of constant hard work does to a person! All the packaging from MH meals would definitely be a limiting factor on a long thru-hike, even just a few weeks on the SHT. Adding protein powder to your custom dehydrated meals might be a good idea.
I cant wait to share my 700 calorie oatmeal recipe. Lol! Im the only person I know that has ever GAINED weight on a backpacking trip. Ha!
Nice tips. A lot of points I would have never thought of. Will have to try some of these but I’m not sure about defried black beans. 😳
Thanks! The beans are quite tasty!!
Again, where is the mentioned follow-up?
Thanks for catching that. Unfortunately no recipes to share at this time so I took the reference out. I do recommend checking out the Backpacking Chef book if you are looking for a good resource on making your own meals. I’m not much of a food writer, I’ll stick to hiking. 🙂